1. Introduction
1.1. Background
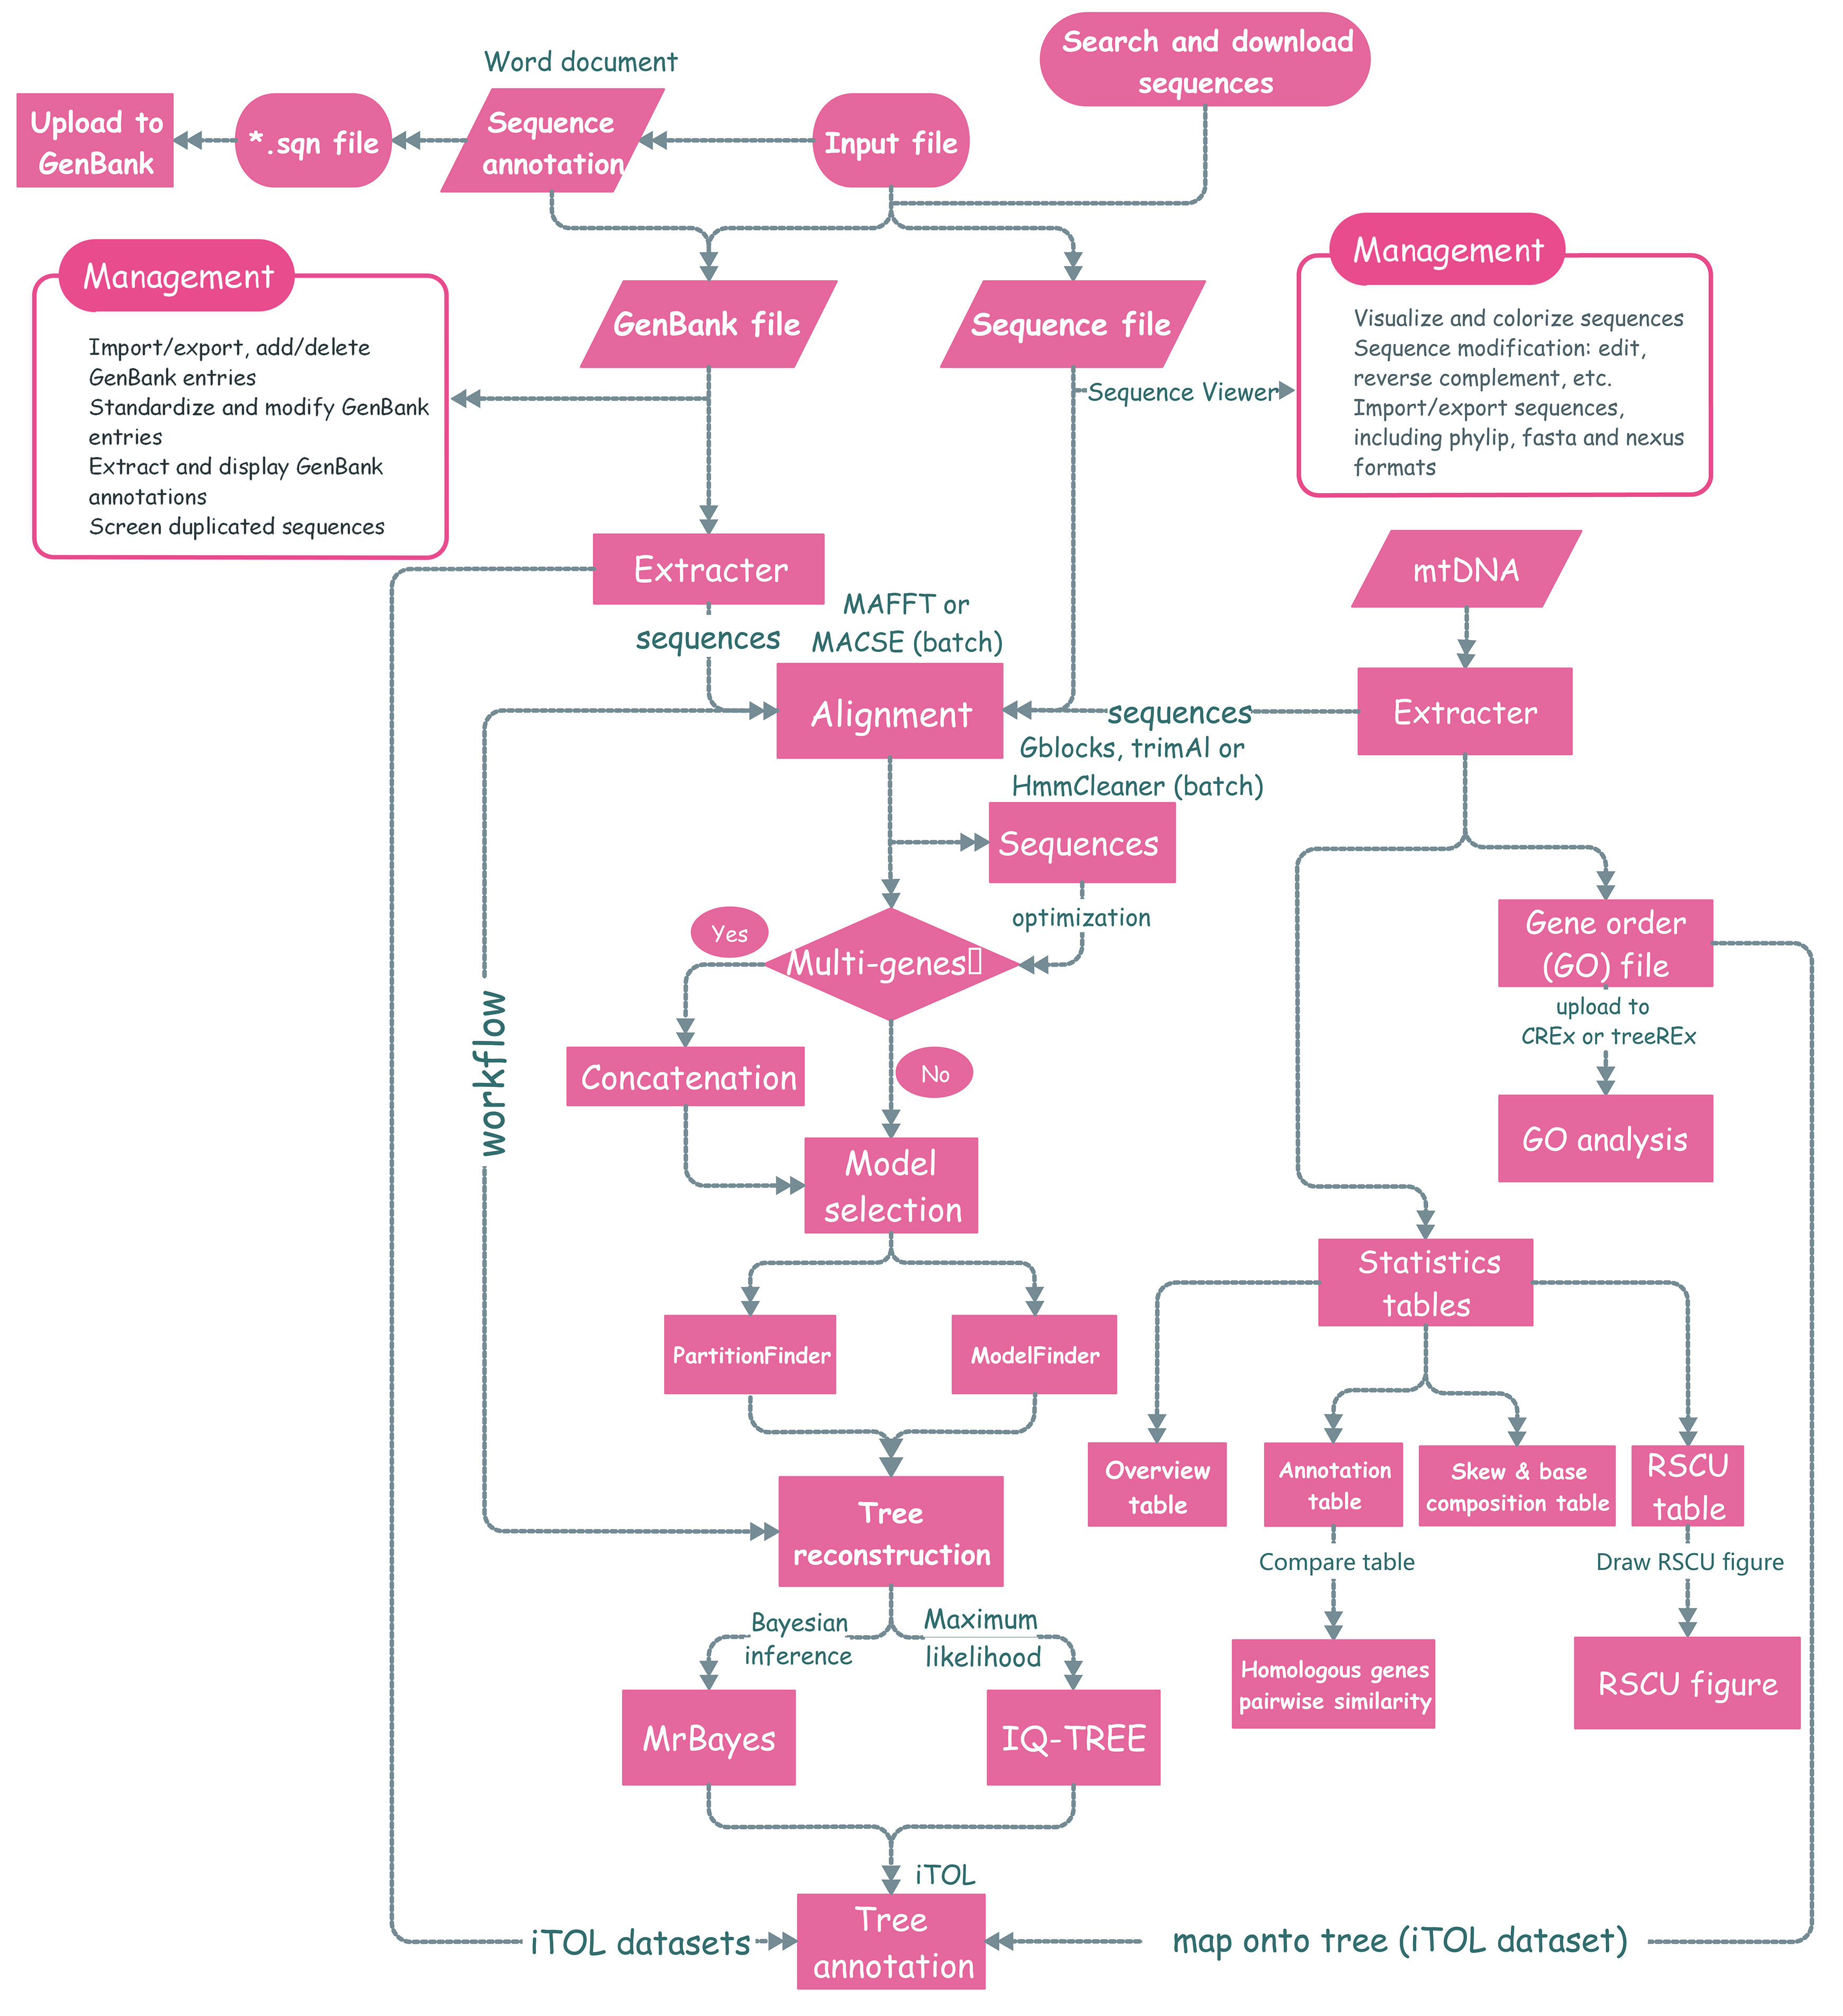
Advancements in the next-generation sequencing (NGS) technologies have resulted in a huge increase in the amount of genetic data available through public databases. While this opens a multitude of research possibilities, retrieving and managing such large amounts of data may be difficult and time-consuming for researchers who are not computer-savvy. Therefore, multifunctional, workflow-type and batch-processing enabled software packages, which can save researchers a lot of time, are becoming increasingly needed by a broad range of evolutionary biologists. PhyloSuite was designed to fill that gap: a user-friendly workflow desktop platform dedicated to streamlining molecular sequence data management and evolutionary phylogenetics studies.
1.2. Functions
PhyloSuite is a user-friendly stand-alone GUI-based software written in Python 3.6.7 and PyQT5. The functions are:
- retrieving, extracting, organizing and managing molecular sequence data, including GenBank entries, nucleotide and amino acid sequences, and sequences annotated in Word documents;
- batch alignment of sequences with MAFFT, for which we added a codon alignment (translation align) mode;
- batch alignment of protein-coding sequences or refinement of alignments with MACSE;
- batch optimization of ambiguously aligned regions using trimAl, HmmCleaner or Gblocks;
- batch conversion of alignment formats (FASTA, PHYLIP, PAML, AXT and NEXUS);
- concatenation of multiple alignments into a single dataset and preparation of a partition file for downstream analyses;
- selection of the best-fit evolutionary model and/or partitioning scheme using ModelFinder or PartitionFinder;
- phylogeny reconstruction using IQ-TREE (maximum likelihood) and/or MrBayes (Bayesian inference);
- linking the functions from (ii) to (viii) into a workflow;
- annotating phylogenetic trees in the iTOL webtool using datasets generated by the (i) function;
- comprehensive bioinformatic analysis of mitochondrial genomes (mitogenomes);
- visualization and editing of sequences using a MEGA-like sequence viewer;
- storing, organizing and visualizing data and results of each analysis in the PhyloSuite workspace.
2. License & Disclaimer
2.1. License
PhyloSuite is a free software, and you are welcome to redistribute it under certain conditions. It is released under the GNU General Public License, Version 3. See http://www.gnu.org/licenses/gpl-3.0.en.html.
2.2. Disclaimer
This program comes with absolutely no warranty. No guarantee of the functionality of this software, or of the accuracy of results obtained, is expressed or implied. Please inspect your results carefully.
3. Operating systems and installation
3.1. Install compiled PhyloSuite
Installers for all platforms can be downloaded from https://github.com/dongzhang0725/PhyloSuite/releases.
3.1.1. Windows
Windows 7, 8 and 10 are supported, just double click the PhyloSuite_xxx_win_setup.exe to install, and run “PhyloSuite.exe” file after the installation. If the installation fails, download PhyloSuite_xxx_Win.rar, unzip it, and run PhyloSuite directly from this folder.
3.1.2. Mac OSX & Linux
Unzip PhyloSuite_xxx_Mac.zip/PhyloSuite_xxx_Linux.tar.gz to anywhere you like, and double click “PhyloSuite” (in PhyloSuite folder) to start, or use the following command:
1 | cd path/to/PhyloSuite |
If you encounter an error of “permission denied”, try to use the following command:
1 | chmod -R 755 path/to/PhyloSuite(folder) |
Note that both 64 bit and 32 bit Windows is supported (Windows 7 and above), whereas only 64 bit has been tested in Linux (Ubuntu 14.04.1 and above) and Mac OSX (macOS Sierra version 10.12.3 and above).
3.2. Install using pip
First, Python (version 3.6) should be installed and added to the environment variable in your computer. Then open the terminal and type:
1 | pip install PhyloSuite |
It will take some time to install. If it installs successfully, PhyloSuite will be automatically added to the environment variables. Then open the terminal again and type:
1
PhyloSuite
If the above pip command failed to install PhyloSuite, you can use compiled PhyloSuite (see section 1) or find and download the source codes here (https://pypi.org/project/PhyloSuite/#files or https://github.com/dongzhang0725/PhyloSuite), and install it manually.
4. Management
4.1. Interface operation
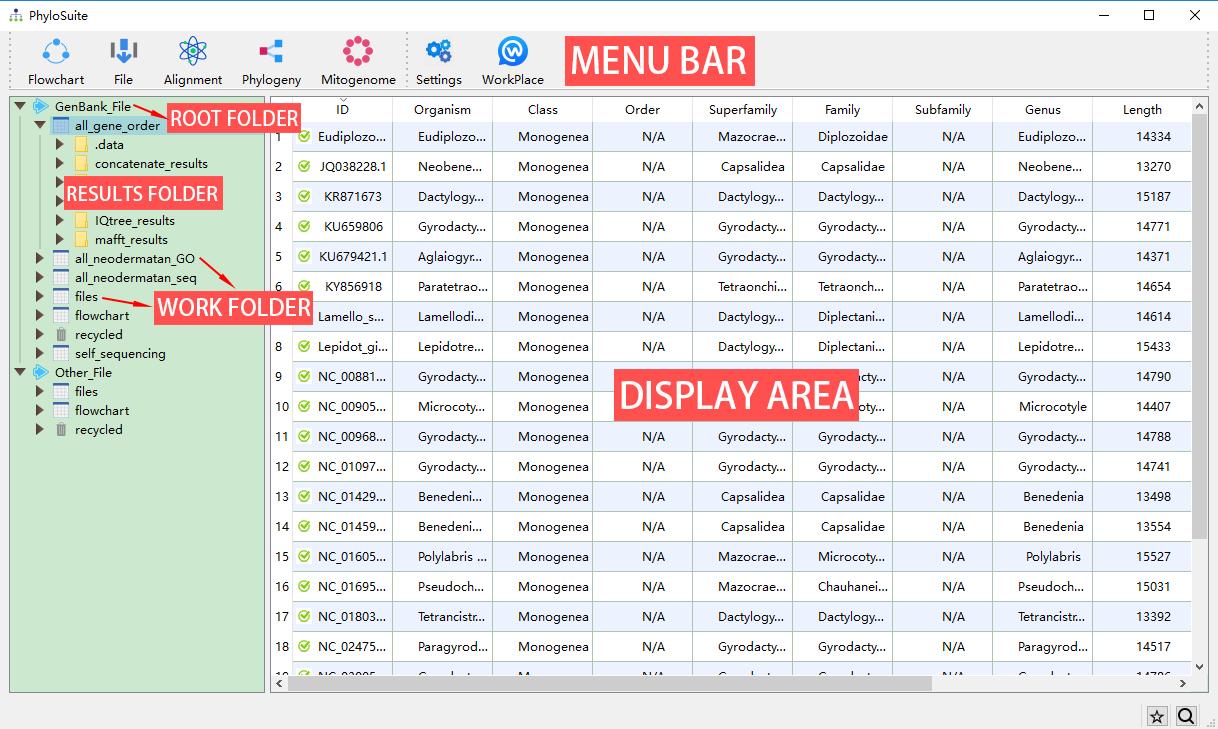
PhyloSuite uses a workplace for data management (although you don’t have to use it), which is set when you first use the program. Later you can change it through the WorkPlace menu. There are two kinds of root folders in each workplace, GenBank_File and Other_File. The GenBank_File folder is used to manage GenBank files and deposit the results of related analyses. The Other_File folder is used to manage other types of sequence files and Word annotation files (nucleotide and amino acid sequences), as well as deposit related results. Below (one level down) from the root folders, you will find work folders, which contain the associated results folders (another level down). In each root folder, PhyloSuite will add files and flowchart work folders by default. You can create a new work folder to deposit your new work (recommended) by mousing over the root folder (GenBank_File and Other_File), either via the green ‘plus’ icon on the right or via the context (right-click) menu. You can remove a work folder via the context menu of the selected folder or by pressing the Delete button in your keyboard. Deleted folders are stored in, and can be recovered from, the recycled folder of the root folder. Once a folder is deleted from the recycle bin, it cannot be recovered. However, it is recommended to delete folders/files from your local file system, as that will enable you to recover them using the inbuilt operating system file recovery function. Note that almost all of the selected settings, such as the window size, position, parameter settings, etc., will be remembered automatically when you close the windows (i.e., there is no need to save the settings before you close a window).
You can access a brief example demo of each function via the question mark button in the window of the corresponding function.
4.1.1. Brief example
- Clicking
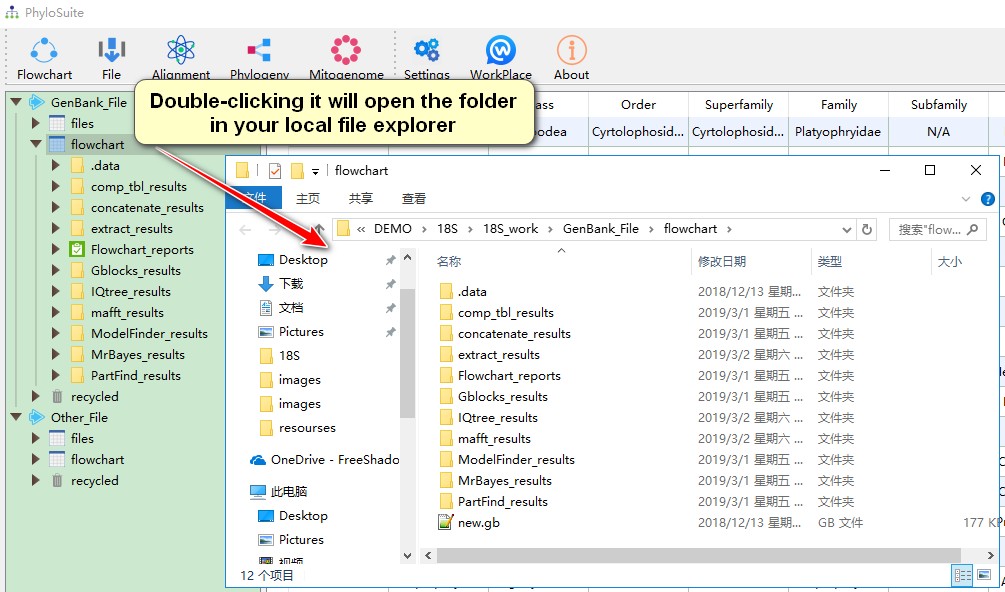
GenBank_FileorOther_Fileroot folders will display the home page of PhyloSuite. Hover mouse over the root folder to viewAdd Work FolderandOpen in Explorerbuttons; the former can be used to create new work folders, whereas the latter opens the folder in your local file explorer;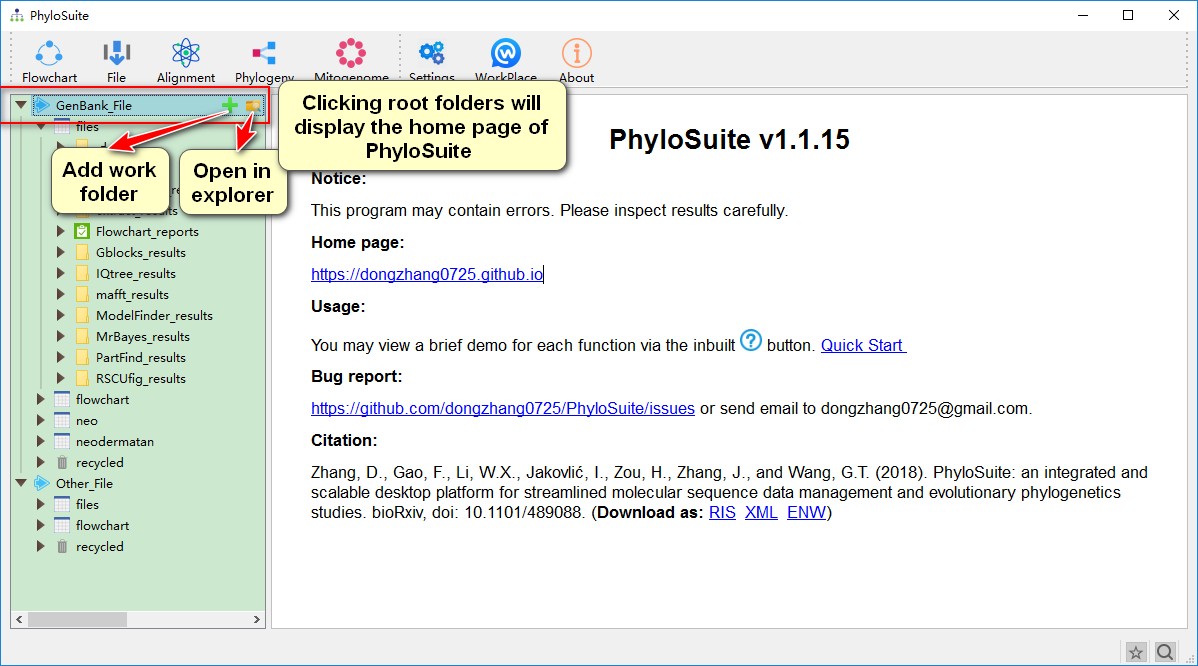
- Selecting any of your work folders (one level below the root folders) will display a list of your saved datasets. Lists of GenBank records are stored in the
GenBank_Fileroot folder, and sequence files are stored in theOther_Fileroot folder. Hover mouse over work folders to seeOpen in ExplorerandGenBank File Information Display Settingbuttons; the later can be used to control which data (for each ID) will be displayed on the main page.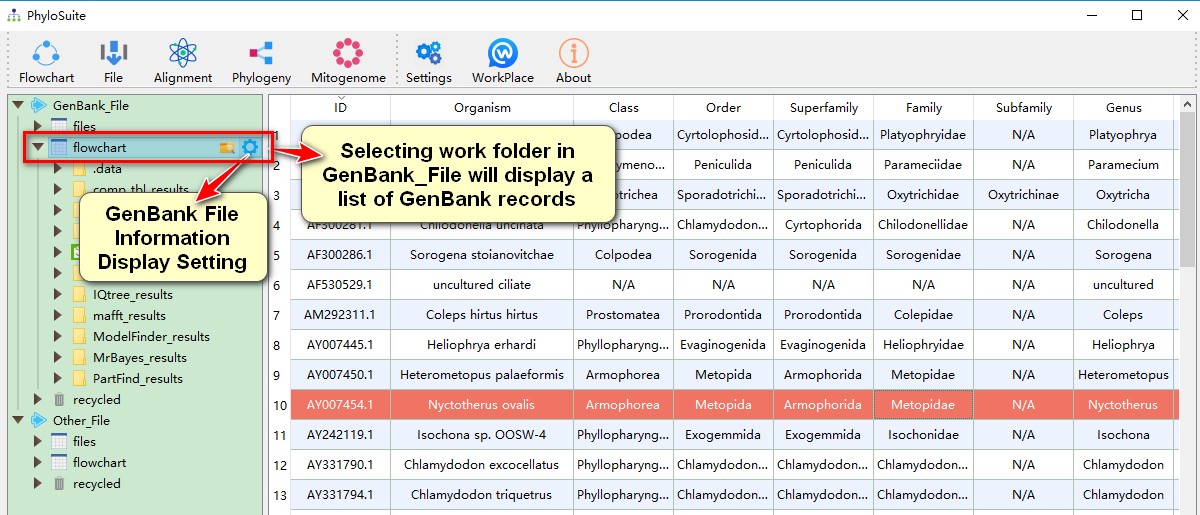
- Selecting results folder (one level below the work folders) will display the results. Hover mouse over results folder to see
Open in Explorer button;
- Double-clicking any of the above folders (root, work and results) will open the folder in your local file explorer;
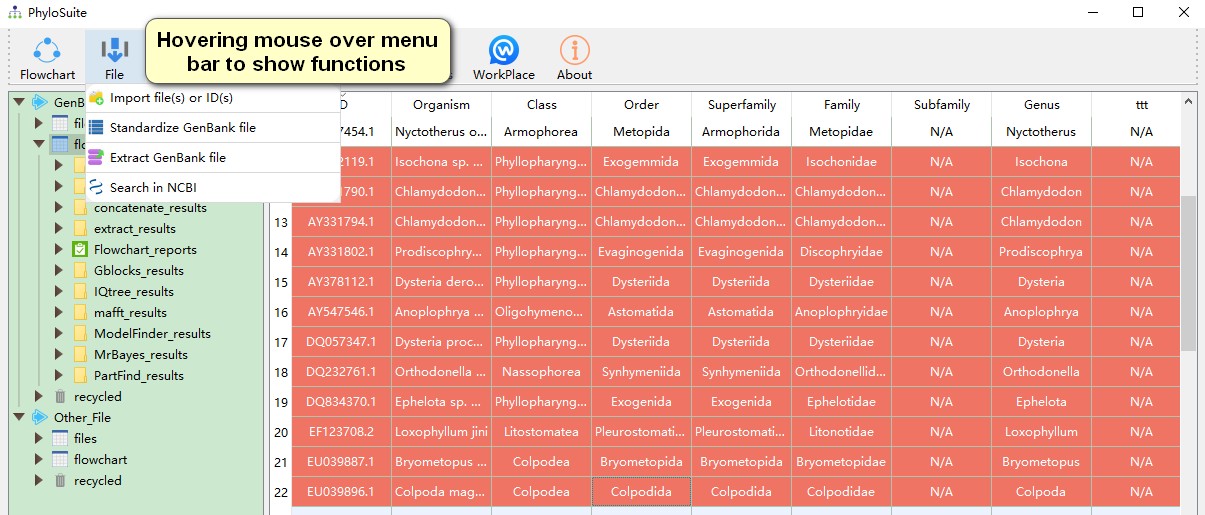
- Hovering mouse over menu bar to select functions to use.
4.2. Plugins installation
PhyloSuite integrates eight plugin programs:
| Programs | Executable File | Description |
|---|---|---|
| MAFFT v7.313 | mafft.bat | Multiple alignment of amino acid or nucleotide sequences |
| IQ-TREE v. 1.6.8 | iqtree.exe | Efficient software for phylogenomic inference |
| MrBayes 3.2.6 | mrbayes_x64.exe or mrbayes_x86.exe |
Bayesian inference of phylogeny |
| PartitionFinder2 | partitionfinder folder | Selection of best-fit partitioning schemes and models of molecular evolution for phylogenetic analyses |
| Gblocks 0.91b | Gblocks.exe | Selection of conserved blocks from multiple alignments for use in phylogenetic analysis |
| Rscript 3.4.4 | Rscript.exe | Required for drawing RSCU figure |
| Python 2.7 | python.exe | Required by PartitionFinder2 |
| tbl2asn | tbl2asn.exe | Automates the creation of sequence records for submission to GenBank (Windows only) |
| MPICH2 | mpirun or mpiexec | A high-performance and widely portable implementation of the Message Passing Interface (MPI) standard that enables a multi-thread MrBayes operation (Linux only) |
| MACSE | macse_v2.03.jar | Multiple Alignment of Coding Sequences Accounting for Frameshifts and Stop Codons. |
| Java (JRE > 1.5) | java.exe | Required by MACSE |
| trimAl | trimal.exe | A tool for automated alignment trimming |
| HmmCleaner | HmmCleaner.pl | Removing low similarity segments from your MSA |
| Perl 5 | perl.exe | Required by HmmCleaner |
These plugins can be installed in Settings-->Plugins.
This can be done in three ways:
- If Python 2.7, Perl 5, Java (JRE > 1.5), HmmCleaner.pl and trimAl have been installed and added to the environment variable ($PATH), they will be automatically detected by PhyloSuite.
- If you already have these programs installed on your computer, you can specify the executable file directly (as indicated in the table above). Note that for PartitionFinder2 you should specify the ‘partitionfinder-2.1.1’ folder.
- If you don’t have these programs, you can use the download button to download and install them automatically. Note: Anaconda Python distribution will download for Python 2.7 (because it contains all of the dependencies required by PartitionFinder2: numpy, pandas, pytables, pyparsing, scipy and sklearn). As it is around 500M in size, so your download may take some time.
Note that the paths of these plugin programs should not contain special characters (^, {, @, etc.).
4.2.1. Brief example
4.3. Import Files
PhyloSuite accepts numerous file formats and extensions:
- GenBank file: *.gb, *.gbk, *.gbf, *.gbff
- fasta: *.fas, *.fasta
- phylip: *.phy, *.phylip
- nexus: *.nex, *.nxs, *.nexus
- Word document file: *.docx
For the demo tutorial of how to import sequences to PhyloSuite, please see five ways to import data into PhyloSuite.
4.3.1. GenBank file
TIP: GenBank file should be in the standard format (see detail).
PhyloSuite provides three ways to import GenBank files into the work folder of the GenBank_File root folder:
- By using the
Import file(s) or ID(s)function under the File menu orOpen file(s)in the main display area. This mode supports the import of complete GenBank files and lists of GenBank accession numbers (IDs), which will then be automatically retrieved from the GenBank by PhyloSuite; - Drag-and-drop GenBank format files into the display area.
- Copy GenBank file contents and paste them into the display area.
4.3.1.1. Brief example
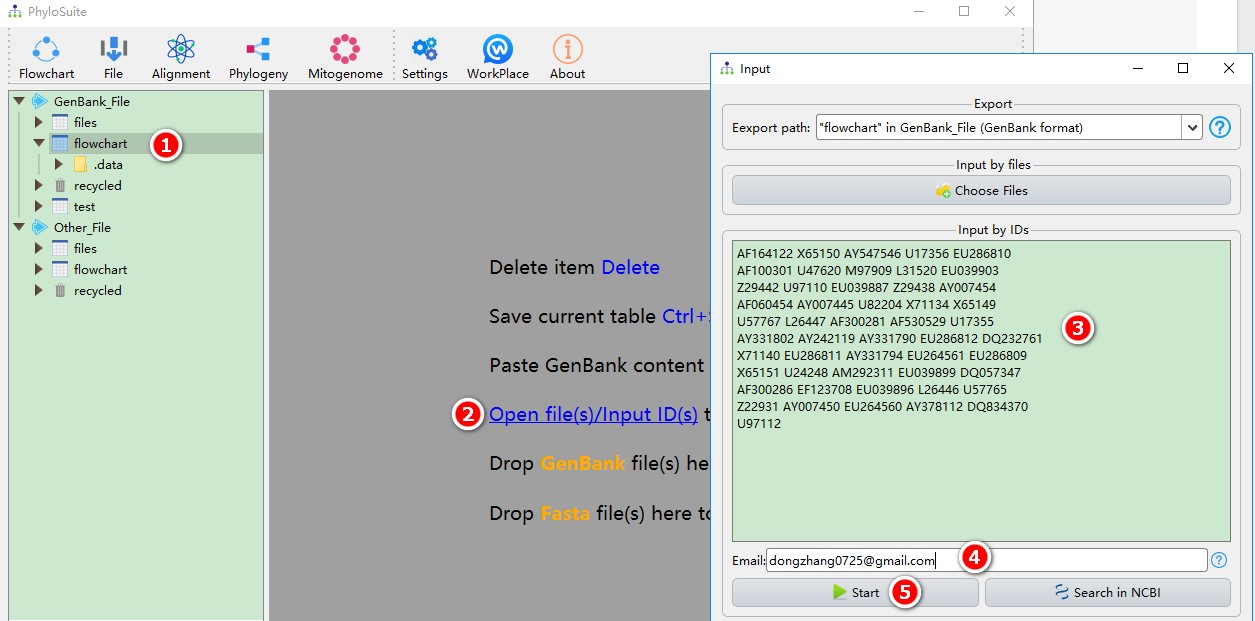
- Select any of the work folders (here I chose files);
- Click Open file(s)/Input ID(s) to open the input window.
- Copy the IDs into the text box (spaces, line breaks, tabs, etc. are supported as separators);
- Enter your email (tell NCBI who is downloading the sequences);
- Click Start to download.
After importing GenBank files, there are options to play with, accessible via the context (right-click) menu, if not specified otherwise:
- Files (IDs) can be added to the dataset that you are working on either by drag/drop or via the context menu (”Add file”).
- The annotation of GenBank files can be standardized (this includes the gene names unification, discussed above) via the
File --> Standardize GenBank filefunction or via the context menu asStandardization. This function opens a new pop-up window, displaying eventual errors and warnings in your dataset, in which you may manually edit the files (mitogenome data only). These usually involve missing genes or non-standardized annotation. For the latter, you may click on the gear button (Settings) in the upper right corner of this window, which opens the GenBank File Extracting settings window discussed above. By ticking the Set NCR threshold box, you may prompt PhyloSuite to recognize the non-coding regions as well (this allows you extract them later using theextractfunction). You can set the threshold for the size (in bp) of the NCRs you wish to be recognized. - For mitogenomic data, a
Predict tRNA (LEU and SER)button is available, via which you may reannotate ambiguously annotated tRNAs with the help of ARWEN. - You can select the information contained within the files you wish to display via the
Settings --> GenBank File Information Display. Examples are: ID, organism, lineages, references, source, etc. (see Information Display section). - The IDs containing identical sequences (duplicates) can be identified and automatically deleted using the
Highlight Identical Sequencesbutton (star-shaped, bottom/right) - You can use the button adjacent to it,
Find Records by IDs, to search for specific IDs. - Each ID can be opened with any text viewer program (Notepad for example) through the context menu, and then manually edited.
- Selected IDs can be exported (context menu) as a GenBank (.gb) file, or a table (.csv) containing the information displayed in the GUI.
- Selected IDs can be imported into a different work folder via drag-and-drop.
4.3.2. Other types of files
Similar to GenBank files, PhyloSuite provides two ways to import alignment files or Microsoft Word document files into the work folder under Other_File root folder:
- Using
Import file(s) or ID(s)function under the File menu orOpen file(s)in the display area. - Drag-and-drop the files into the display area.
After importing files, again there are many options to play with:
- For multiple sequence files, the number of sequences in the file and alignment status (aligned or non-aligned) will be displayed.
- Files and sequences can be deleted, exported, or added.
- The alignment can be directly used as input file for any (relevant) plug-in function:
MAFFT,Gblocks,Concatenate Sequence,Convert Sequence Format,Sequence Viewer,Partitionfinder2,ModelFinder,IQ-TREE, andMrBayesfunctions. Parse Annotationfunction is available only for *.docx files.- All alignments could be managed in
Sequence Viewer, they can be reversed, complement, reverse complement and pruned.
Note that FASTA format files can also be imported into any work folder under the GenBank_File root folder, in which case the file will be automatically converted to the GenBank file format (see five ways to import data into PhyloSuite for details).
4.3.3. Search in the NCBI
You can search sequences from the NCBI’s Nucleotide and Protein databases via the File --> Search in NCBI function.
4.3.3.1. Brief example
- Open
File-->Search in NCBIin the menu bar; - Enter keywords (
Monogenea[ORGN] AND (mitochondrion[TITL] OR mitochondrial[TITL]) AND 10000:50000[SLEN]); - Enter your email to tell NCBI who is downloading the sequences;
- Press Enter key or click search button to start searching;
- After the search is completed, select a work folder to deposit the sequences; selecting a work folder within the
GenBank_Fileroot folder will download sequences in the GenBank format, whereas selecting a work folder within theOther_Fileroot folder will download sequences in the FASTA format; - Click the
Downloadbutton to start downloading.
4.4. GenBank file settings
The format of GenBank file is show below (for detailed GenBank format please visit https://www.ncbi.nlm.nih.gov/Sitemap/samplerecord.html):
FEATURES             Location/Qualifiers
    source[Feature] 1..5028
                    /organism[Qualifier]  ="Saccharomyces cerevisiae[Value or Name]"
                    /db_xref[Qualifier]   ="taxon:4932[Value or Name]"
                    /chromosome[Qualifier]="IX[Value or Name]"
                    /map[Qualifier]       ="9[Value or Name]"
    CDS[Feature]    1..206
                    /product[Qualifier]   ="TCP1-beta[Value or Name]"
4.4.1. Lineage recognition
This can be set in Settings-->Settings-->Taxonomy Recognition.
You can define the identifier of each taxonomic rank. It supports the wildcard character *, for example, most of the family names end with “dae”, thus you can define the family taxonomic rank as *dae. However, in some taxonomic groups, rank names don’t necessarily follow the same rule, as for example in the Malacostraca, Hoplocarida and Peracarida both end with “carida”, but they are a subclass and a superorder respectively. In this case, you’d better use the full name as the identifier. Additionally, you can exclude terms when you use the wildcard character; for example, if you use *oda to recognize the orders in crustaceans, you will have to exclude Arthropoda by adding -Arthropoda in a new row of the order column, because it is a phylum.
Taxonomic ranks can be added or deleted. For example, you can add a Suborder through the Add Column button, or delete any taxonomic rank by selecting it and clicking the Delete Column button. Please ensure that taxonomic ranks are arranged (left to right) from high to low level. You can change the order of taxonomic ranks by dragging them. Whenever you change the settings, you can update the table through the Refresh table option accessed via the right-click menu in the display area.
Note that taxonomic lineages of each ID/species listed in the display area (GenBank_File workspace) are automatically recognized from GenBank files. If you wish, you may replace them with taxonomic data from the NCBI’s Taxonomy database (https://www.ncbi.nlm.nih.gov/taxonomy) or WoRMS database (http://www.marinespecies.org/index.php) via the context (right-click) menu of the selected ID/species.
4.4.2. Information display and modification
For each work folder (of GenBank_File) you can define which information will be displayed. This can be set in Settings-->GenBank File Information Display (you should select a work folder before) or click the GenBank File Information Display Setting button to the right of the name of each GenBank_File work folder.
There are numerous data in GenBank files that can be displayed, so PhyloSuite classifies them into four sections: Annotations, Lineages, Reference and Sources (qualifiers from source feature).
| Annotations | Lineages | Reference | Sources |
|---|---|---|---|
| ID | Class | author(s) | host |
| Length | Order | title(s) | specimen_voucher |
| AT% | Superfamily | journal(s) | collection_date |
| Name | Family | pubmed ID(s) | isolation_source |
| Organism | Subfamily | comment(s) | country |
| Definition | Genus | collected_by | |
| Date | … | organelle | |
| Keywords | note | ||
| Molecule type | mol_type | ||
| Topology | strain | ||
| Accessions | db_xref | ||
| Sequence version | … | ||
| Source | |||
| Latest modified |
Note that the information for Lineages and Sources is variable. Lineages can be configured (see Lineage Recognition). All of the qualifiers in the source feature of GenBank files from all IDs in the work folder will be presented as available options. In this way, the available options for Source are dependent on the GenBank files in this work folder.
Additionally, some of the information can be modified by double-clicking the corresponding cell. For example, there may be some errors in the lineage names, which you can correct in the display area. The new name will then be used in GenBank File Extracter and other functions. Fields that cannot be modified are “ID”, “Length”, “AT%”, “State”, “Date”, “Latest modified”, “author(s)”, “title(s)”, “journal(s)”, “pubmed ID(s)”, “comment(s)”, “Keywords”, “Molecule type”, “Topology”, “Accessions”, “Sequence version”, “Source”, “State”.
4.4.3. Features extraction
This is a flexible function, details of which can be set in Settings-->GenBank File Extracting.
There are three main steps:
- First, you can define which features you wish to extract, such as CDS, rRNA and tRNA etc.
- Second, you can define the value of a GenBank file qualifiers that is to be used as the name of a feature. For example, you can select to extract only the value of the qualifier
productfor rRNA, and simultaneously select to extract the value of the qualifiersgeneandproductfor CDS. In this case, PhyloSuite will first search the value/name ofgenefor CDS, if there is nogenequalifier it will search the value/name ofproduct(note that qualifiers can be reordered by dragging). If none of the specified qualifiers are found for features, it will be recorded in a table file when using the GenBank File Extracter function, or marked as an error when using the Standardization function. - Finally, you can uniformize the annotation of your dataset by replacing the values/names searched in the previous step via the
Names unificationtable. The ‘Old Name’ will be replaced with the ‘New Name’ if found in the corresponding qualifiers when using GenBank File Extracter or Standardization functions. If you wish to extract only a subset of features (genes) for which value/name are available in this table, you may do so by checking theOnly extract these genescheckbox. This table can be exported, or imported (export/import settingsfunction below the table) from a comma-separated table (*.csv). There is a convenient way to uniformize names: if you extract genes without any settings for the first time, a “name_for_unification.csv” file will be generated, which can be used to set the new names and then imported into the settings (“csv” format is mandatory). Note that values/names of all qualifiers of all features are included in a single table.
By default, PhyloSuite provides settings for six data types (loci): Mitogenome, chloroplast genome, general, cox1, 16S and 18S. You may add more data types as desired and switch between them via the Current version button (bottom/left). You are allowed to associate different settings with each data type. The three features (CDS, tRNA and rRNA) of the Mitogenome data type are fixed, so they cannot be deleted, but new features can be added. If you are not sure which data type to use, you can select general and then adjust the settings according to your needs.
4.4.3.1. Brief example
Please see http://phylosuite.jushengwu.com/dongzhang0725.github.io/PhyloSuite-demo/customize_extraction/.
4.5. File operation
4.5.1. Input files
For input files for the functions implemented in PhyloSuite, you can either allow the software to autodetect them from workplace or you can specify input files yourself.
4.5.1.1. Autodetect input files
PhyloSuite can autodetect and prepare input files for each function. For example, the IQ-TREE function accepts the results of Concatenate Sequence (concatenate_results), Partitionfinder2 (PartFind_results), ModelFinder (ModelFinder_results) and the alignment file in Other_File.
This function could be triggered in three ways:
- If you open IQ-TREE with the listed folders or alignment files selected, they will auto load to IQ-TREE.

- Every time when you open the IQ-TREE, PhyloSuite will search the entire workplace, and sort all acceptable input files for IQ-TREE.

- If you are in the interface of the IQ-TREE without an input file, clicking on the input box shall open the selection from the step 2.
The relationships of input files and functions are summarized below:
| Function | Input Files |
|---|---|
| IQ-TREE | concatenate_results, PartFind_results, ModelFinder_results and alignment file |
| MrBayes | PartFind_results, ModelFinder_results and alignment file |
| ModelFinder | concatenate_results and alignment file |
| PartitionFinder2 | concatenate_results |
| MAFFT | extract_results and alignment file |
| MACSE | mafft_results, extract_results and alignment file |
| Gblocks | MACSE_results, mafft_results, concatenate_results and alignment file |
| trimAl | MACSE_results, mafft_results, concatenate_results and alignment file |
| HmmCleaner | MACSE_results, mafft_results, concatenate_results and alignment file |
| Convert Format | MACSE_results, mafft_results, Gblocks_results, trimAl_results, HmmCleaner_results and alignment file |
| Concatenate Sequence | MACSE_results, mafft_results, Gblocks_results, trimAl_results, HmmCleaner_results and alignment file |
Alignment file here refers to the alignment files listed in the Other_File root folder.
For results folder names refer to Output Files
4.5.1.2. Specify input files
There are two ways:
- Drag files into the “Input” box;
- Click the ‘open folder’ icon to the right of the input box.
4.5.2. Output files
The results of all the functions will be automatically saved in the workplace. If you have selected a work folder, then the results will be saved to that work folder. If you haven’t selected one, the results will be saved to GenBank_File/files or Other_File/files. You may also change the results folder name, as well as select another work folder to deposit your results, via the down-arrow of the Start button.
Functions and default results folders:
| Function | Results folder |
|---|---|
| IQ-TREE | IQtree_results |
| MrBayes | MrBayes_results |
| ModelFinder | ModelFinder_results |
| PartitionFinder2 | PartFind_results |
| MAFFT | mafft_results |
| MACSE | MACSE_results |
| Gblocks | Gblocks_results |
| trimAl | trimAl_results |
| HmmCleaner | HmmCleaner_results |
| Convert Format | convertFmt_results |
| Concatenate Sequence | concatenate_results |
| Draw RSCU figure | RSCUfig_results |
| Compare Table | comp_tbl_results |
| Flowchart | Flowchart_reports |
4.5.2.1. Brief example
Please see here.
5. Data analysis
5.1. Extract GenBank file
The input file for this function can be loaded only by selecting IDs in the display area of the work folder under the GenBank_File root folder. For the results, please see the Output Files section.
There are two modes for extraction, Single loc. mode will extract the entire sequence but ignore annotation and other features, which is suitable for single locus, such as 18S, cox1 and 28S etc.; Custom mode allows you to select or edit the type of sequence and features that you wish to extract (see GenBank File Extracting settings).
What it can do:
- Extract genes defined (selected) in the GenBank File Extracting settings and save them in the fasta format. For example, if you select to extract
CDS,tRNAandrRNAfeatures, this function will extract these features from all selected GenBank files and store them in correspondingly named folders (CDS, tRNA, rRNA). Additionally,CDSfeature will be split into two folders: ‘CDS_AA’ folder contains the amino acid sequences extracted from thetranslationqualifier, whereas ‘CDS_NUC’ folder contains the nucleotide sequences. For the Mitogenome version, there is an additional “self-translated_AA” folder that contains the amino acid sequences translated from the nucleotide sequences (CDS) by the PhyloSuite. Note that there may exist duplicated genes within one ID, in which case PhyloSuite will number the duplicated gene names in the order they occur. For example, if there are threecox1genes, then they will be saved ascox1.fas,cox1_copy2.fasandcox1_copy3.fas. Additionaly, PhyloSuite also providesResolve gene duplicatesfunction (available inParameterstab) to automatically identify and remove duplicated genes. - Extract overlapping and intergenic regions.
- Generate statistics files and files used for other analyses:
- Generates an extraction overview file (
overview.csv), which records the data type settings used for extraction, all features found in the sequences, missing features or qualifiers, and genes found in each species. - The information about the species (IDs) included in the dataset, including organism name, lineages, A/T/C/G content, and AT/GC skewness. [StatFiles/used_species.csv]
- A name table for editing the
Names unificationtable in the GenBank File Extracting settings. Using this table, you can modify the names in the ‘New Name’ column and then import it into theNames unificationtable. This table is extremely useful when extracting genes for the first time. [StatFiles/name_for_unification.csv] - If
Only extract these genesis checked and none of the qualifier values conform to the name inNames unificationtable, then these values will be recorded in thename_not_included.csvtable. [StatFiles/name_not_included.csv] - Overall statistics of the mitogenome, including nucleotide composition of the whole genome, protein-coding genes (PCGs), rRNA genes and tRNA genes. [StatFiles/used_species.csv, Mitogenome version]
- Initial and stop codon, nucleotide content, skewness as well as length statistics for each PCG and rRNA genes. [StatFiles/geneStat.csv, Mitogenome version]
- Nucleotide skewness for each codon site of PCGs. [StatFiles/CDS/[PCGsCodonSkew.csv | firstCodonSkew.csv | secondCodonSkew.csv | thirdCodonSkew.csv], Mitogenome version]
- Nucleotide content and skewness of individual elements and the complete mitogenome of all species (IDs) (see Fig. 2 in https://parasitesandvectors.biomedcentral.com/articles/10.1186/s13071-017-2404-1 and Fig. 1 in https://doi.org/10.1186/s12862-018-1249-3) [StatFiles/geom_line.csv, Mitogenome version]
- Nucleotide statistics of each species (IDs). [StatFiles/speciesStat/*IDs.csv, Mitogenome version]
- Organization table for each species (IDs). [StatFiles/speciesStat/*IDs_org.csv, Mitogenome version]
- Relative synonymous codon usage table. Note that the abbreviated stop codons (T–, TA-) are removed before the calculation. [StatFiles/RSCU/*IDs_RSCU.csv, Mitogenome version]
- Amino acid usage table. [StatFiles/RSCU/*IDs_AA_usage.csv, Mitogenome version]
- Generates an extraction overview file (
- Making ITOL datasets (will be activated if you check the
ITOL datasetscheckbox)- These are simple *.txt files that you can directly drag-and-drop onto corresponding dendrograms in the iTOL web interface (https://itol.embl.de)
- Replacing tip labels in batch. [itolFiles/[itol_labels.txt | itol_gb_labels.txt | itol_ori_labels.txt]]
- Assigning colors to different lineages. Colors for each taxon (or lineage) can be specified in
Lineage color. If you don’t select colors for all taxons, PhyloSuite will randomly assign colors to the remaining taxons. For adding or removing lineages, please clickConfigurebutton (see Fig. 1 in https://journals.plos.org/plosone/article?id=10.1371/journal.pone.0181699). [itolFiles/[itol_xxx_ColourStrip.txt | itol_xxx_Text.txt | itol_xxx_Colour.txt]] - Mapping histogram to the tree (see Fig. 2 in https://parasitesandvectors.biomedcentral.com/articles/10.1186/s13071-017-2245-y). [itolFiles/[itolAT.txt | itolLength.txt | itolLength_stack.txt]]
- Mapping gene order to the tree. The color, length and shape of each gene icon, as well as the space between the icons (Gene Interval), for the gene order display can be modified using the
Gene order displayfunction. At this step you can also select NCRs to be visualized (if you have set up the PhyloSuite to recognize and extract them, including setting the size threshold, during theStandardizationstep) (see Fig. 6 in https://bmcevolbiol.biomedcentral.com/articles/10.1186/s12862-018-1249-3). [files/itol_gene_order.txt, Mitogenome version]
- Gene order file which can be used to conduct relative analysis using CREx and/or treeREx.
In the Custom menu, you can choose among the data types pre-set in GenBank File Extracting settings. In the Lineages menu, you can choose which lineages to include in the results. Regarding the names of sequences, user can customize them via Name Type function, in which ID, organism, Family, Class, isolate, strain, etc. are available.
5.1.1. Brief example
- Select IDs to extract (refer to this to see how to import GenBank records into PhyloSuite);
- Open
Extractvia right-click, and the sequences will be imported automatically; - Parameters can be set according to your own needs (if your data are mitochondrial genomes, select
Mitogenomedata-type); - Start the program.

For customizing the extraction, please see Customizing the extraction
For comprehensive demos, please see multi-gene tutorial and single-gene tutorial. For how to use the generated iTOL datasets, please see phylogenetic tree annotation.
5.2. MAFFT
For installation of MAFFT, please see Plugins Installation section. For input files for MAFFT, please see Input Files section. Note that the input file should be in the FASTA format. For the results of MAFFT, please see Output Files section.
PhyloSuite enables MAFFT to run multiple files in batches using the same set of parameters, which means that you can input multiple files into MAFFT simultaneously. PhyloSuite provides three alignment modes for MAFFT:
- Normal mode: align sequence normally.
- Codon mode (added by PhyloSuite): the nucleotide sequences of protein-coding genes are translated into AA sequences first, then the AA sequences are aligned by MAFFT, finally the AA alignments are back-translated into corresponding codons. Note that you should choose a proper code table first.
- N2P mode (added by PhyloSuite) is identical to the previous mode minus the last step (back-translation): PCGs are translated into AAs and aligned. The result is the AA alignment.
When aligning with codon mode, if there are internal stop codons, PhyloSuite will pop up a warning window. If you are aware of this problem, feel free to ignore it and continue the alignment (select ‘Ignore’), otherwise terminate the alignment and inspect the problem (select ‘Yes’). -adjustdirection can auto-adjust the direction of some sequences (i.e. reverse complement). Other parameters are also available, such as align strategy, export format and thread etc.
After inputting files and setting parameters, you are ready to click the Start button and start the program. The run log can be viewed through Show log button. Once the program is finished, the parameter settings and the citation of MAFFT will be saved in the summary.txt file.
5.2.1. Brief example
When you are in the PhyloSuite root folder, go to ‘example\MAFFT\mtDNA_36_genes\CDS_NUC’ folder (if you don’t have the newest example folder, please download it from here),
- Select all 12 files;
- Open
Alignment-->MAFFTthrough the menu bar; - Drag all 12 sequences into the file input box;
- Parameters can be set according to your own needs (make sure to select the correct
Code Tablefor protein-coding genes, here is 9); - Start the program.

For comprehensive demos, please see multi-gene tutorial and single-gene tutorial. For a comprehensive manual of MAFFT, please visit https://mafft.cbrc.jp/alignment/software/manual/manual.html.
5.3. MACSE
For installation of MACSE, please see Plugins Installation section. For input files for MACSE, please see Input Files section. Note that the input file should be in the FASTA format. For the results of MACSE, please see Output Files section.
PhyloSuite enables MACSE to run multiple files in batches using the same set of parameters, which means that you can input multiple files into MACSE simultaneously. In addition, multi-core operation is also allowed, which allows several files (depends on threads set) to run simultaneously.
MACSE has many subprograms and it already has a GUI, so we only added alignSequences and refineAlignment subprograms to PhyloSuite. We believe these two are most suitable for PhyloSuite, in terms of complementing the shortcomings of MAFFT. The input of MACSE should be either protein-coding sequences (for alignSequences) or an alignment (for refineAlignment) generated by other programs (e.g. MAFFT). Regarding batch processing, if there are multiple files in both Seq. and Seq_lr. boxes, these files will be combined successively, for example, the first file of Seq. (-seq 1st_seq_file) will combine with the first file of Seq_lr. (-seq_lr 1st_seq_lr_file). Noteworthy, the seq and seq_lr options must be used together or not at all in combination with Refine (refineAlignment). Please note that PhyloSuite also provides the View | Edit command function in the dropdown arrow of the ‘Start’ button, which gives sufficient freedom for experienced users to modify and add parameters that are not included in the GUI.
In particular, as the generated alignment files may contain exclamation (!) or star (*) symbols (emphasize the frameshifts detected by MACSE), which may cause errors in downstream analyses. Therefore, PhyloSuite generates an additional file with _removed_chars_ in its name, which replaces these symbols with ?.
After inputting files and setting parameters, you are ready to click the Start button and start the program. The run log can be viewed through Show log button. Once the program is finished, the parameter settings and the citation of MACSE will be saved in the summary.txt file.
5.3.1. Brief example
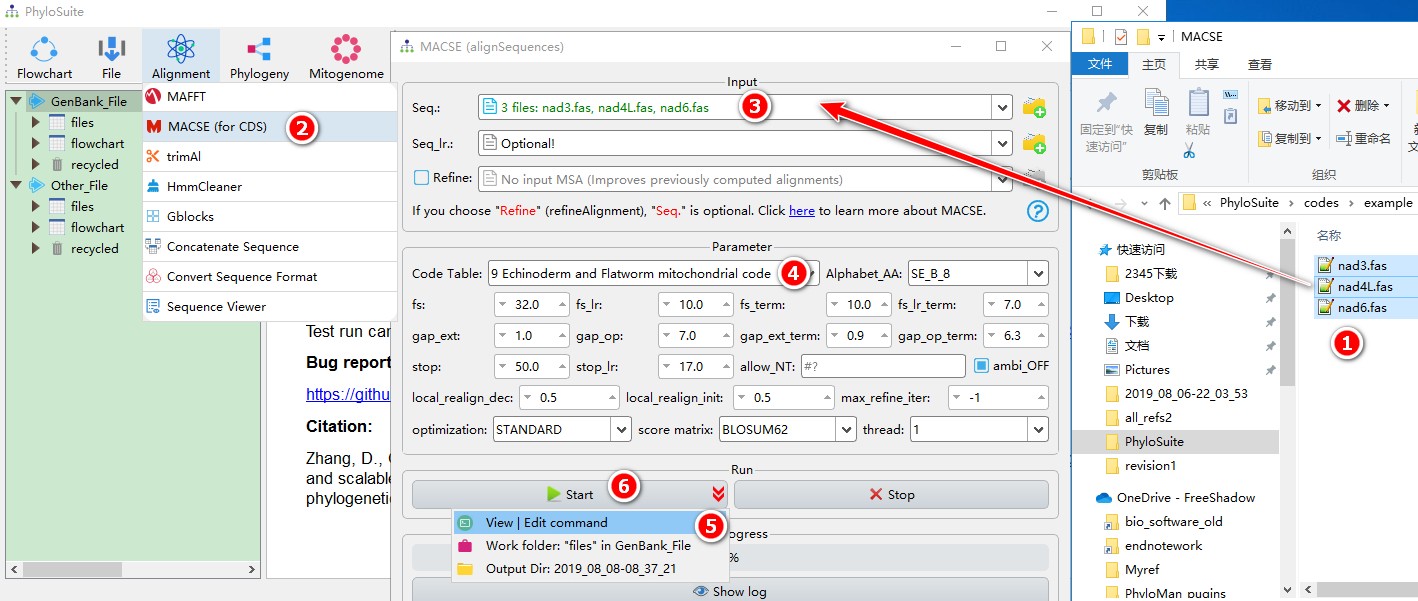
When you are in the PhyloSuite root folder, go to ‘example\MACSE’ folder (if you don’t have the newest example folder, please download it from here),
- Select all 3 files;
- Open
Alignment-->MACSE (for CDS)through the menu bar; - Drag all 3 sequences into the
Seq.input box; - Parameters can be set according to your own needs (make sure to select the correct
Code Table; in the example we selected 9); - parameters that are not included in the GUI can be added via the
View | Edit commandfunction in the dropdown arrow of the ‘Start’ button; - Start the program.
For a comprehensive manual of MACSE, please visit https://bioweb.supagro.inra.fr/macse/index.php?menu=intro.
5.4. trimAl
For the installation of trimAl, please see Plugins Installation section. For inputting files into trimAl, please see Input Files section. For the results of trimAl, please see Output Files section.
PhyloSuite enables trimAl to run multiple files in batches using the same set of parameters, which means you can input multiple files into trimAl simultaneously. In addition, multi-core operation is also allowed, which allows several files (depends on threads set) to run simultaneously. Please note that PhyloSuite also provides the View | Edit command function in the dropdown arrow of the ‘Start’ button, which gives sufficient freedom for experienced users to modify and add parameters that are not included in the GUI.
If you want to apply the results of trimAl to downstream analyses, please ensure that you select fasta as output format. If you select the Statistics output, these results will be saved to a file with the suffix “.log”. As the output file extension _trimAl is recognized by downstream functions, it cannot be changed.
After inputting files and setting parameters, clicking the Start button runs the program. You can view the running log through the Show log button. Parameter settings and citation for trimAl will be saved in the summary.txt file.
5.4.1. Brief example
When you are in the PhyloSuite root folder, go to ‘example\trimAl_HmmCleaner’ folder (if you don’t have the newest example folder, please download it from here),
- Select all 3 files;
- Open
Alignment-->trimAlthrough the menu bar; - Drag all 3 sequences into the input box;
- Parameters can be set according to your own needs;
- Parameters that are not included in the GUI can be added via the
View | Edit commandfunction in the dropdown arrow of the ‘Start’ button; - Start the program.
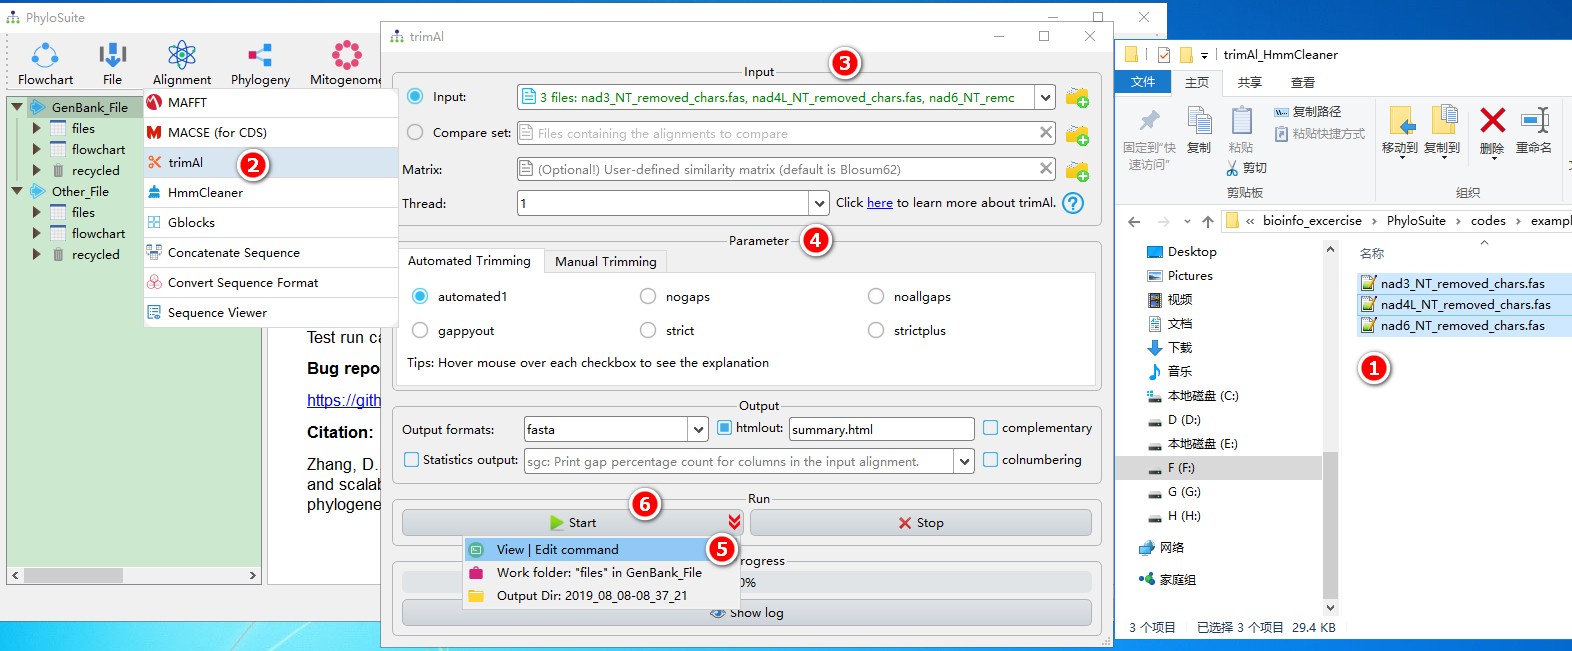
For a comprehensive manual of trimAl, please visit http://trimal.cgenomics.org.
5.5. HmmCleaner
For the installation of HmmCleaner, please see Plugins Installation section. For inputting files into HmmCleaner, please see Input Files section. For the results of HmmCleaner, please see Output Files section.
PhyloSuite enables HmmCleaner to run multiple files in batches using the same set of parameters, which means you can input multiple files into HmmCleaner simultaneously. In addition, multi-core operation is also allowed, which allows several files (depends on threads set) to run simultaneously. Due to HmmCleaner design contraints, this program is available only to linux and mac users. If you want to apply the results of HmmCleaner to downstream analyses, please ensure that you uncheck the ali output format.
After inputting files and setting parameters, clicking the Start button runs the program. You can view the running log through the Show log button. The parameter settings and the citation for HmmCleaner will be saved in the summary.txt file.
5.5.1. Brief example
When you are in the PhyloSuite root folder, go to ‘example\trimAl_HmmCleaner’ folder (if you don’t have the newest example folder, please download it from here),
- Select all 3 files;
- Open
Alignment-->HmmCleanerthrough the menu bar; - Drag all 3 sequences into the input box;
- Parameters can be set according to your own needs;
- parameters that are not included in the GUI can be added via the
View | Edit commandfunction in the dropdown arrow of the ‘Start’ button; - Start the program.
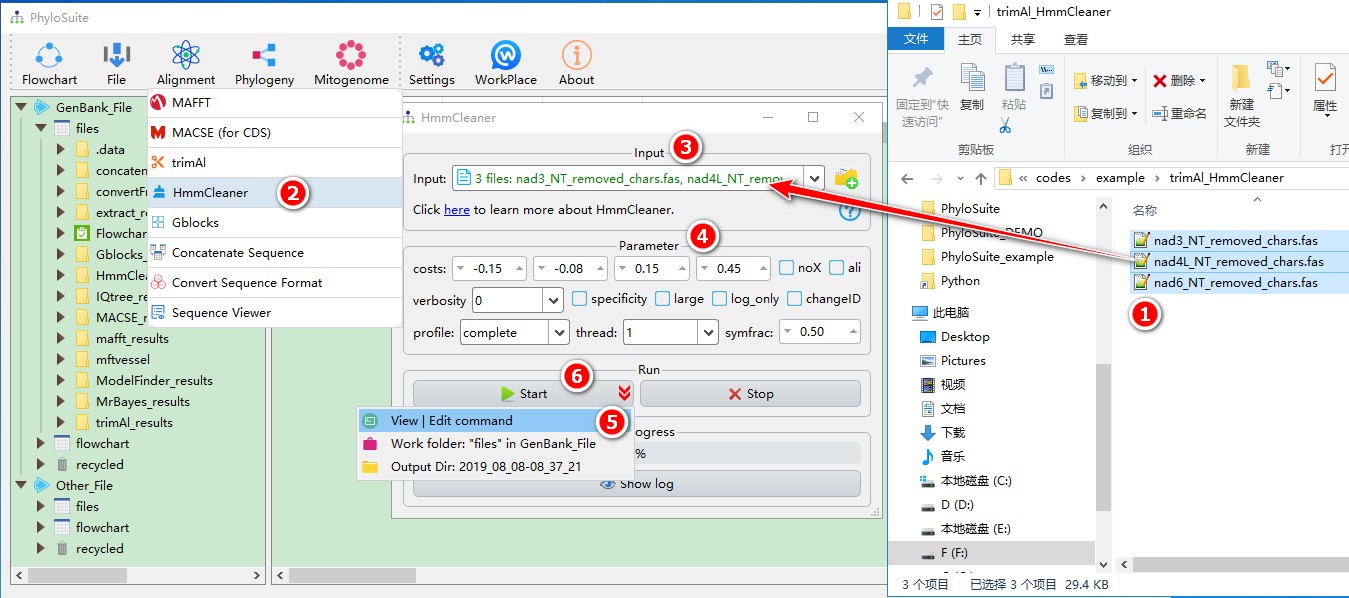
For a comprehensive manual of HmmCleaner, please visit https://metacpan.org/pod/distribution/Bio-MUST-Apps-HmmCleaner/bin/HmmCleaner.pl.
5.6. Gblocks
For the installation of Gblocks, please see Plugins Installation section. For inputting files into Gblocks, please see Input Files section. Note that the input files should be in FASTA or NBRF/PIR formats. For the results of Gblocks, please see Output Files section.
PhyloSuite enables Gblocks to run multiple files in batches using the same set of parameters, which means you can input multiple files into Gblocks simultaneously.
The two options, Minimum Number Of Sequences For A Conserved Position and Minimum Number Of Sequences For A Flank Position will be enabled after inputting files. As the former variable has to be > half the number of sequences, whereas the latter variable has to be ≥ the value of former variable. The available values of these two variables will change according to this rule.Because of this, when running batch analyses on multiple files, the number of sequences in each file must be the same.
As the default output file extension ‘_gb’ is recognized by downstream functions, it cannot be changed.
After inputting files and setting parameters, clicking the Start button runs the program. You can view the running log through the Show log button. The parameter settings and the citation for Gblocks will be saved in the summary.txt file.
5.6.1. Brief example
When you are in the PhyloSuite root folder, go to ‘example\Gblocks\mtDNA_36_genes\CDS_NUC’ folder (if you don’t have the newest example folder, please download it from here),
- Select all 12 files;
- Open
Alignment-->Gblocksthrough the menu bar; - Drag all 12 sequences into the file input box;
- Parameters can be set according to your own needs (ensure you choose proper data types, here it should be codons);
- Start the program.
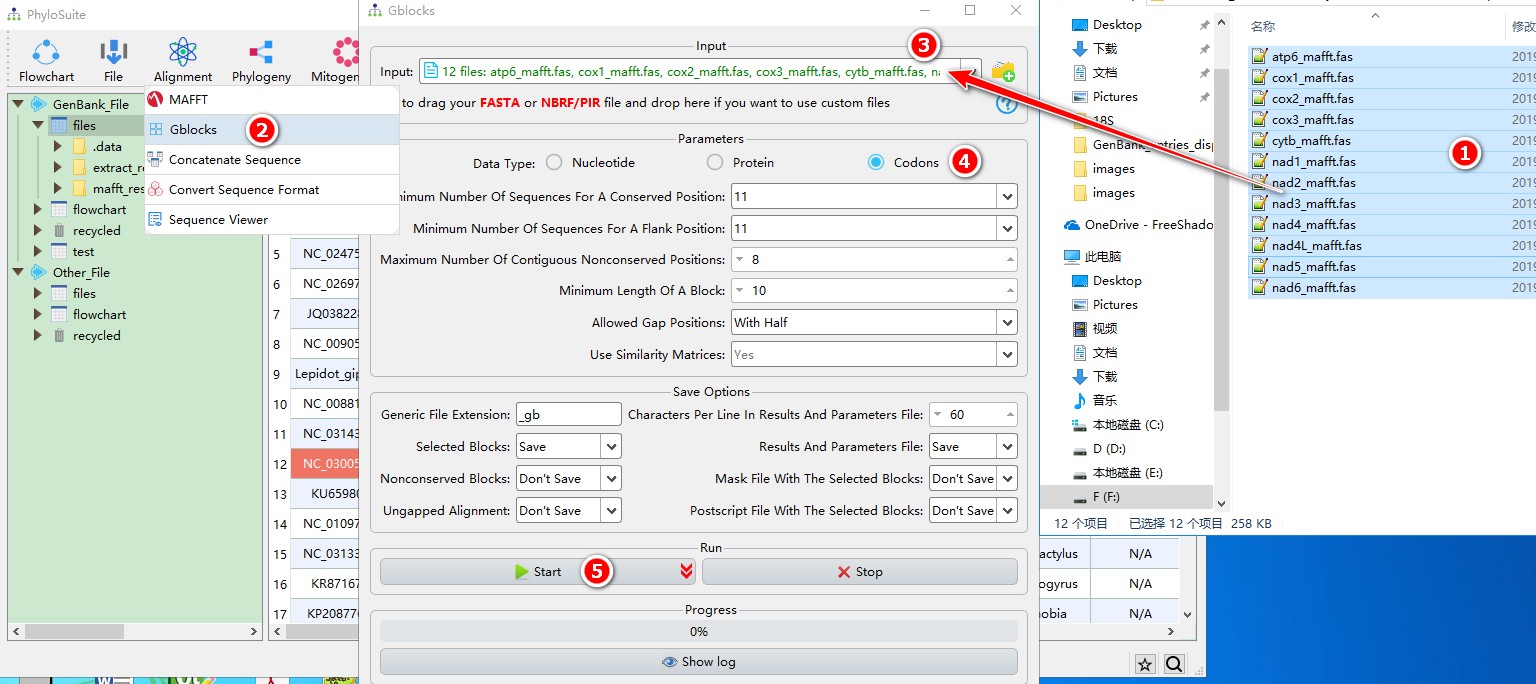
For a comprehensive manual of Gblocks, please visit http://molevol.cmima.csic.es/castresana/Gblocks/Gblocks_documentation.html.
5.7. Concatenate Sequences
For inputting files, please see Input Files section. FASTA, PHYLIP, AXT, PAML and NEXUS formats are allowed. For the results, please see Output Files section. Note that the name of the output file can be changed.
Alignments can be concatenated into a single alignment using this function. First, PhyloSuite will scan each of the alignments and collect all of the sequence names, then it will concatenate these alignments by searching the names in each alignment. If a name can’t be found in the alignment, it will be recorded in the ‘missing_genes.txt’ file.
A number of common formats can be chosen for the output file, such as PHYLIP, NEXUS, AXT, PAML and FASTA. Additionally, the function can record the index of each gene during the concatenation and generate a partition file, which can be used in PartitionFinder, ModelFinder, IQ-TREE and MrBayes. User can also select to remove any codon sites (such as third codon site) in this analysis.
You can change the order in which alignments are concatenated by dragging the files to reorder them.
5.7.1. Brief example
When you are in the PhyloSuite root folder, go to ‘example\Concatenation\mtDNA_36_genes\36_genes_NUC’ folder (if you don’t have the newest example folder, please download it from here),
- Select all 36 files;
- Open
Alignment-->Concatenate Sequencethrough the menu bar; - Drag all the sequences into the file input box;
- Output formats could be selected according to your own needs, you may also select
Linear figurefunction if you wish to visualize the concatenated dataset; - Start the program.
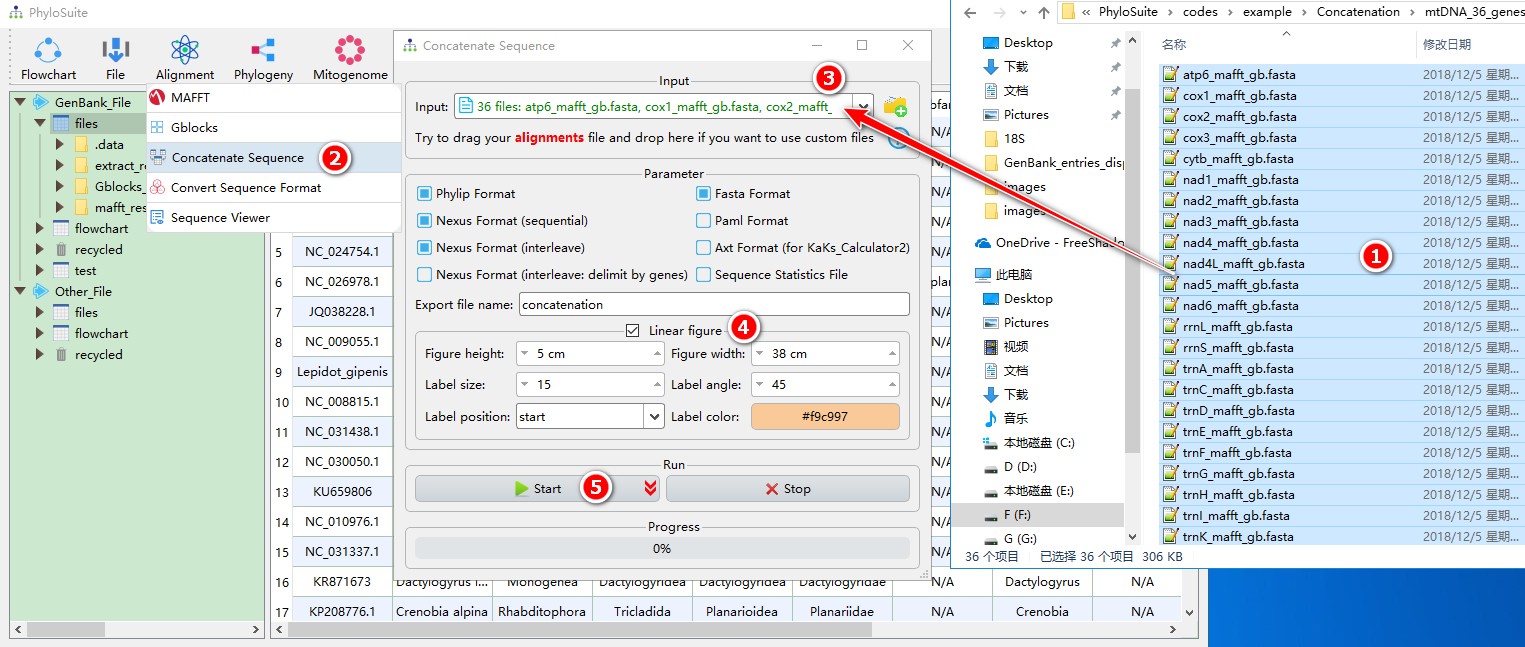
For comprehensive demos, please see multi-gene tutorial and single-gene tutorial.
5.8. Convert format
For inputting files, please see Input Files section. For the results, please see Output Files section.
PHYLIP, NEXUS, AXT, PAML and FASTA formats are supported (both for input and output files). This function also supports batch format conversion, which means that you can input multiple files simultaneously.
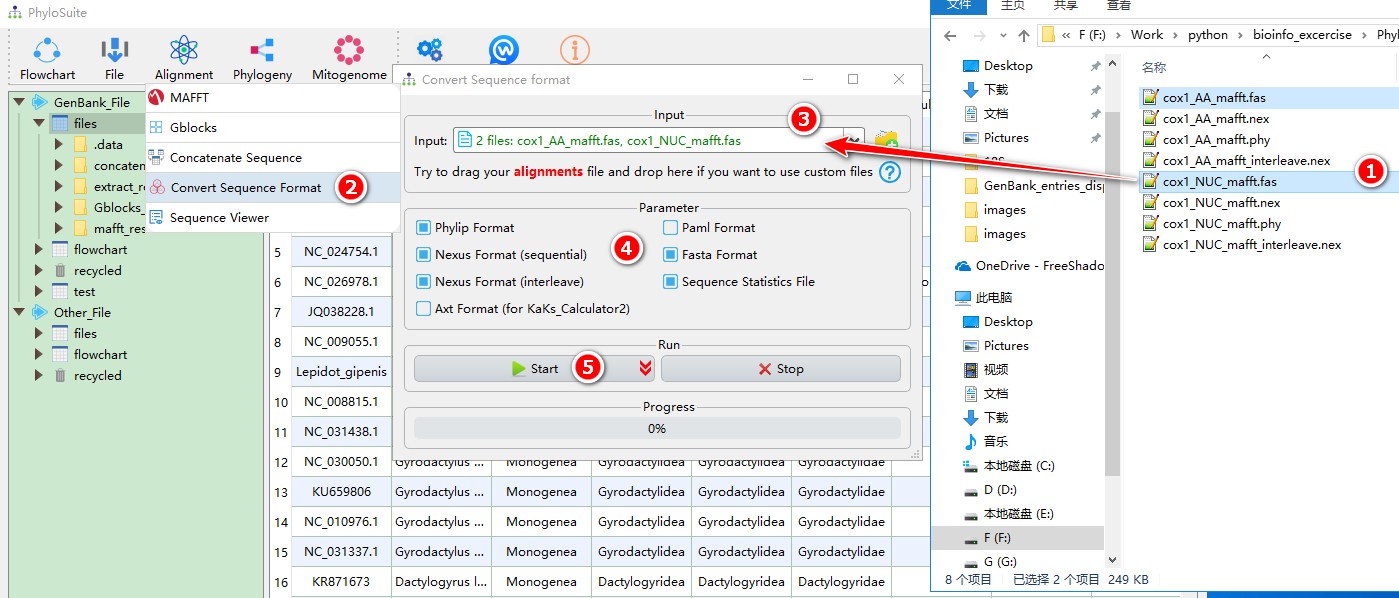
5.8.1. Brief example
When you are in the PhyloSuite root folder, go to ‘example\Convert_format’ folder (if you don’t have the newest example folder, please download it from here),
- Select ‘cox1_AA_mafft.fas’ and ‘cox1_NUC_mafft.fas’;
- Open
Alignment-->Convert Sequence Formatthrough the menu bar; - Drag them into the file input box;
- Select output formats;
- Start the program.
5.9. ModelFinder
For the installation of ModelFinder (IQ-TREE), please see Plugins Installation section, for input alignment files see Input Files section (FASTA, PHYLIP, NEXUS and CLUSTAL formats are allowed), and for the result files see Output Files section.
You may choose to provide two more optional files: a tree file (newick format) and a partition file. Please see http://www.iqtree.org/doc/Advanced-Tutorial for the format of the partition file. The most convenient option is to directly use the results of Concatenate Sequence (concatenate_results) as input files for ModelFinder. The concatenated alignments and the partition file will load to ModelFinder automatically (see brief example below).
PhyloSuite provides an additional parameter for ModelFinder settings: Model for. This parameter allows you to select a set of models you wish to test, suited for different phylogenetic programs (see table below). This is very useful, as different algorithms often use different model types.
| Options | Corresponding arguments in ModelFinder |
|---|---|
| MrBayes | -m TESTONLY -mset mrbayes |
| RaxML | -m TESTONLY -mset raxml |
| PhyML | -m TESTONLY -mset phyml |
| IQ-TREE | -m TESTNEWONLY |
| BEAST1 | -mset JC69,TrN,TrNef,K80,K2P,F81,HKY,SYM,TIM,TVM,TVMef,GTR -mrate E,G |
| BEAST2 | -mset JC69,TrN,TrNef,K80,K2P,F81,HKY,SYM,TIM,TVM,TVMef,GTR -mrate E,G |
After inputting files and setting the parameters, you may click Start button and run the program. The running log can be viewed through Show log button. Once the program is finished, the parameter settings and the citation for IQ-TREE will be saved in the summary.txt file.
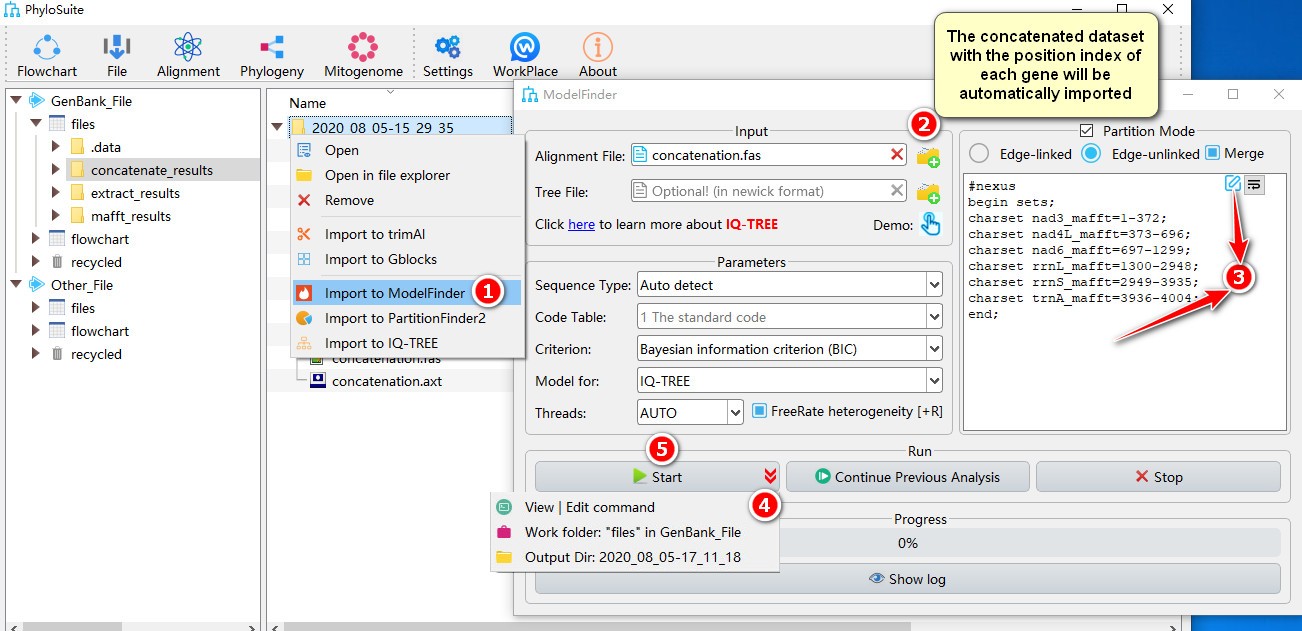
5.9.1. Brief example
- Right click a result in
concatenate_resultsfolder (if not available, please see here for how to make one), then selectImport to ModelFinderin the context menu; - The concatenated dataset with the position index of each gene will be automatically imported;
- Double-click the text box or click the edit button to open the partition editor window to configure
data blocks(for how to operate partition editor, please see below); - Parameters can be set according to your own needs; parameters that are not included in the GUI can be added using the
View | Edit commandfunction in the dropdown arrow of the ‘Start’ button; - Start the program.
For comprehensive demos, please see multi-gene tutorial and single-gene tutorial. For a comprehensive manual of ModelFinder, please visit http://www.iqtree.org/doc/ and http://iqtree.cibiv.univie.ac.at/.
5.10. PartitionFinder
For installation of PartitionFinder2, please see Plugins Installation section, for inputting the alignment file (PHYLIP format) see Input Files section, for the results see Output Files section. You may provide a tree file as well (optional, newick format).
The most convenient way to use PartitionFinder2 is to use the results of Concatenate Sequence (concatenate_results) as input files. The concatenated alignments and the partition file will load into the PartitionFinder2 automatically.
PartitionFinder2 requires a data block to run, the default format of which is (see DATA BLOCKS window):
Gene1_codon1 = 1-999\3;
Gene1_codon2 = 2-999\3;
Gene1_codon3 = 3-999\3;
Gene2 = 1000-1665;
intron = 1666-2000;
PhyloSuite provides a partition editor function, in which you can add/delete/modify partitions and convert/cancel the selected data block to the codon format. For how to use this function, please see below.
Note that among the Command line options, --all-states and --min-subset-size can only be used when kmeans is selected in the search menu. The options hcluster, rclusterf and rcluster in search menu as well as --rcluster-max and --weights in the Command line options will be enabled only when --raxml is checked in the Command line options. The unlinked option in the branchlengths menu should be used with caution, as it may hinder convergence when using the partition results to conduct an analysis in MrBayes (because of unlink brlens=(all);).
After inputting files and setting the parameters, you can start the program (Start button), and view the run log through the Show log button. Once the program is finished, the parameter settings and the citation for PartitionFinder2 will be saved in the summary.txt file.
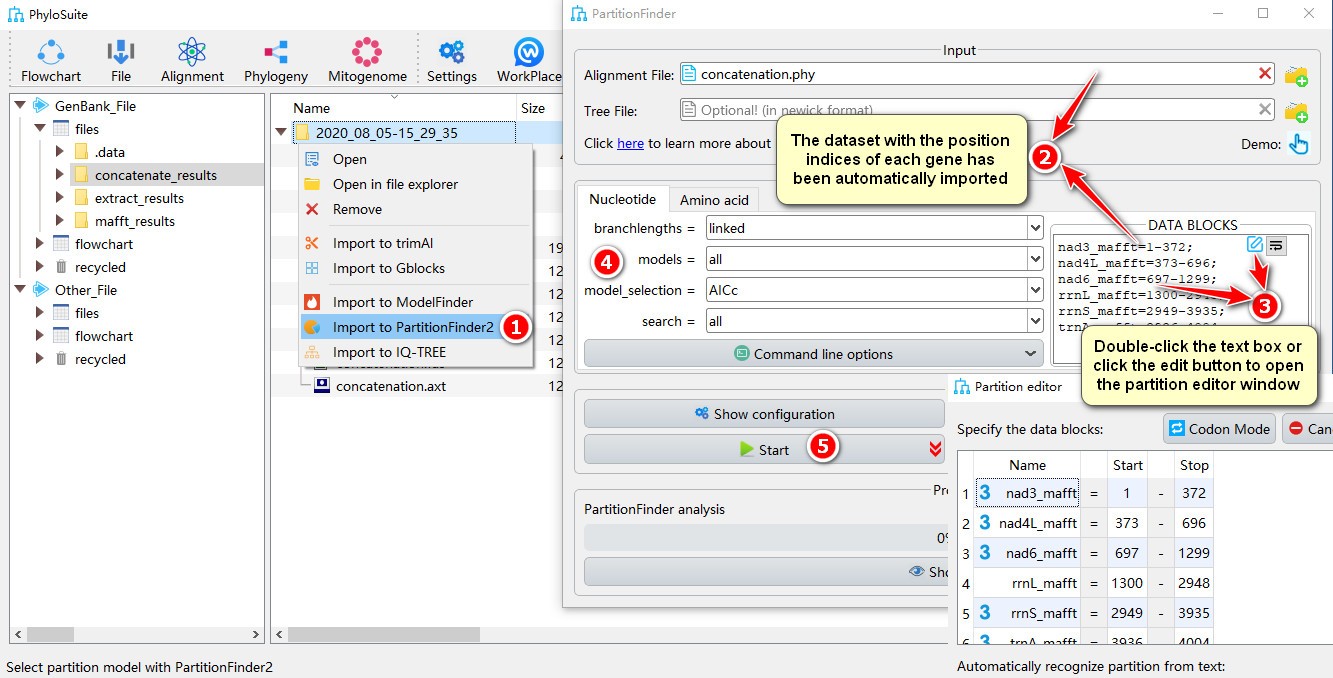
5.10.1. Brief example
One design feature of PhyloSuite is a direct link between the outputs of Concatenation and the inputs of PartitionFinder2:
- Right click a result in
concatenate_resultsfolder (if not available, please see here for how to make one), then selectImport to PartitionFinder2in the context menu; - The concatenated dataset with the position index of each gene will be automatically imported;
- Double-click the text box or click the edit button to open the partition editor window to configure
data blocks(for how to operate partition editor, please see below); - Other parameters can be set according to your own needs (make sure you choose proper data types);
- Start the program.
For a comprehensive demo, please see multi-gene tutorial. For a comprehensive manual of PartitionFinder2, please visit http://www.robertlanfear.com/partitionfinder/assets/Manual_v2.1.x.pdf.
5.10.2. Brief tutorial for partition editor
- The number
3shown to the left of the data block name indicates that the length of the sequence is a multiple of 3, select one or more data blocks (make sure they are protein-coding genes) exhibiting the icon3and then clickCodon Modebutton, the partition(s) will be changed to codon mode, in which icons1,2, and3correspond to partitions comprising first, second and third codon position of the gene, respectively.;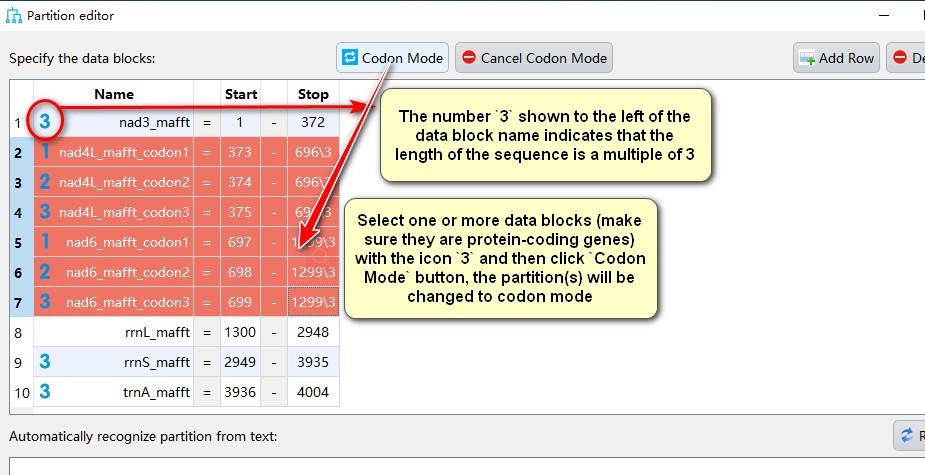
- Select gene name(s) with icons
1,2, and3, then clickCancel Codon Modeto change back to the normal partiton mode.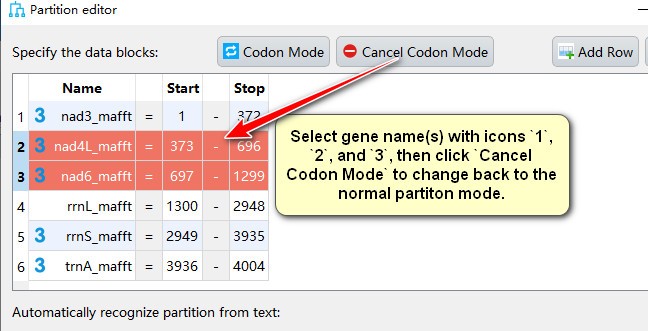
- The
Name,StartandStopcolumns can be modified via double-clicking the corresponding cells;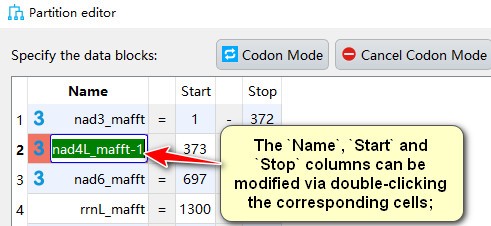
- Closing the window will automatically save the modified partitions;
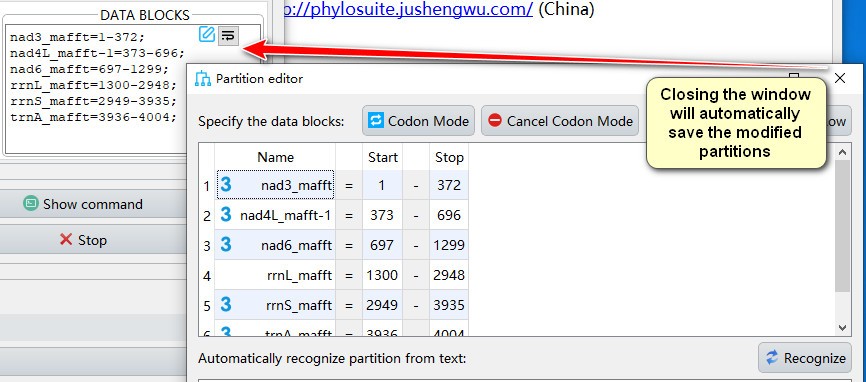
- If you want to manually add partition to data blocks, you can paste the text in partition format in the text box below, and then click the
Recognizebutton.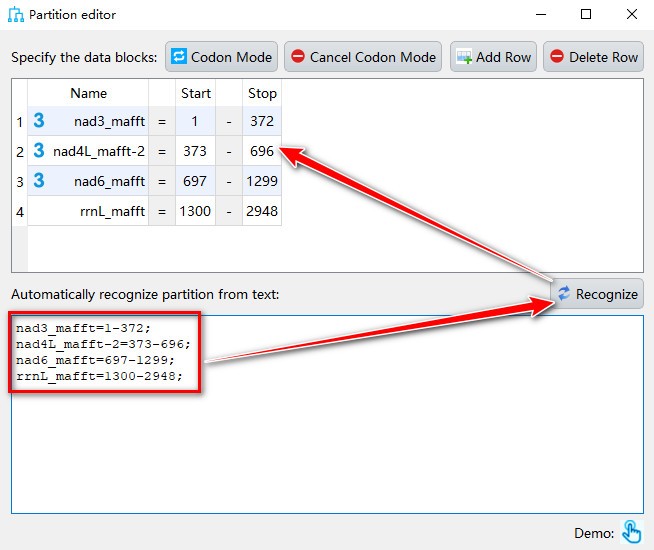
5.11. IQ-TREE
For the installation of IQ-TREE, please see Plugins Installation section, for the results see Output Files section, for input files see Input Files section. FASTA, PHYLIP, NEXUS and CLUSTAL formats are allowed.
Optionally, you may input a partition file (check the box). Please see http://www.iqtree.org/doc/Advanced-Tutorial for detailed format requirements for the partition file. The most convenient option is to use the results of Concatenate Sequence (concatenate_results) as input files for IQ-TREE: the concatenated alignments and the partition file will load to IQ-TREE automatically. Similarly, when using the results of PartitionFinder2 or ModelFinder as input files of IQ-TREE, the alignment file, the partition and the best-fit model selection will also load into the IQ-TREE automatically.
Alternatively, IQ-TREE can select the best-fit model and immediately continue with the tree reconstruction (using the inferred model) by setting Models to Auto and either check ‘FreeRate heterogeneity [+R]’ (-m TESTNEW) or not (-m TEST). We also enabled IQ-TREE to reconstruct phylogenetic trees in batches, which can be used to infer supertrees.
After inputting files and setting the parameters, you may start the program (Start button), and view the run log through the Show log button. Once the program is finished, the parameter settings and the citation for the IQ-TREE will be saved in the summary.txt file.
5.11.1. Brief example
When you are in the PhyloSuite root folder, go to ‘example\IQ-TREE\mtDNA_36_genes\36_genes_NUC\normal’ folder (if you don’t have the newest example folder, please download it from here),
- Select ‘concatenation.phy’ file;
- Open
Phylogeny-->IQ-TREEthrough the menu bar; - Drag it into the file input box;
- Select best-fit evolutionary model and associated parameters (+I, +G, etc.) (here if you choose
Auto, IQ-TREE will select the best-fit model and immediately continue with the tree reconstruction, see above); - Parameters can be set according to your own needs (if you don’t have a partition file, remember to uncheck
Partition Mode), parameters that are not included in the GUI can be added via theView | Edit commandfunction in the dropdown arrow of the ‘Start’ button; - Start the program.
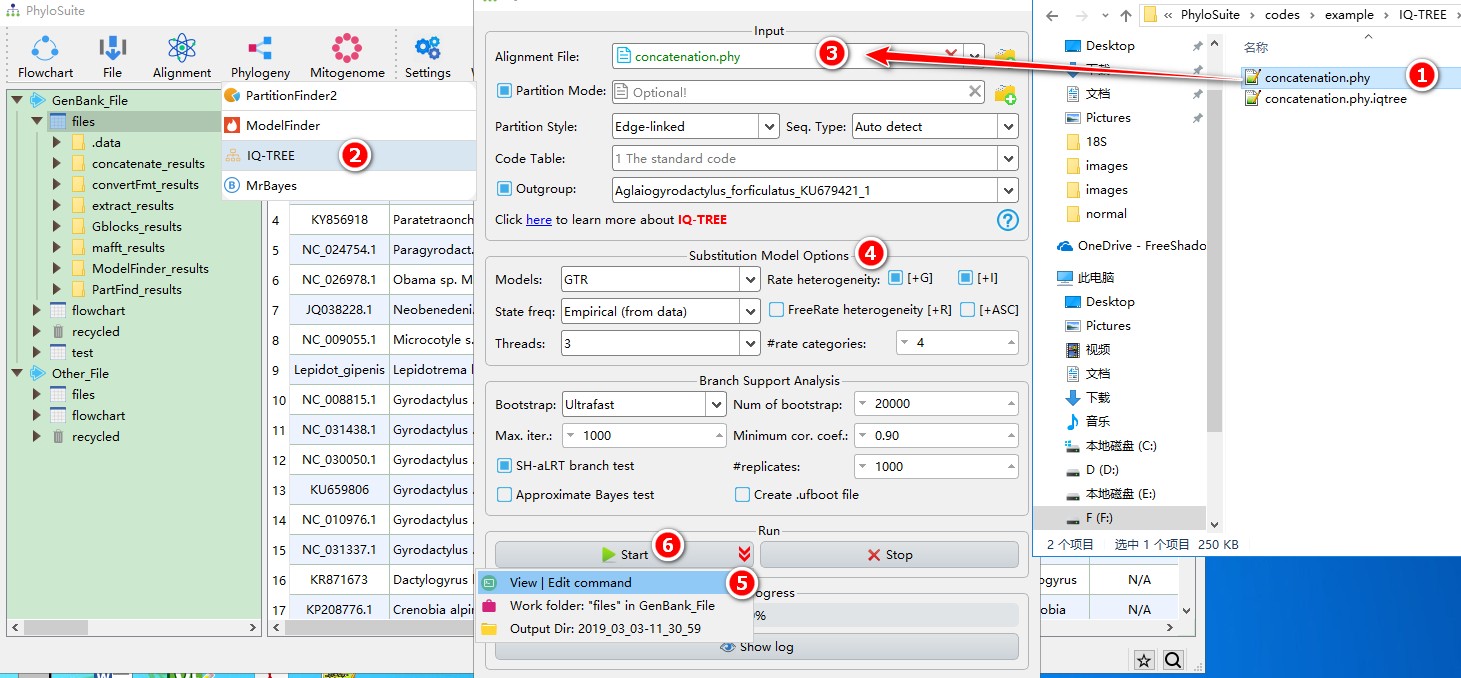
IQ-TREE can directly use the outputs of ModelFinder and/or PartitionFinder2, please see multi-gene tutorial and single-gene tutorial. For a comprehensive manual of IQ-TREE, please visit http://www.iqtree.org/doc/ and http://iqtree.cibiv.univie.ac.at/.
5.12. MrBayes
For the installation of MrBayes, please see Plugins Installtion section, for result files see Output Files section, for Input Files see Input Files section. Note that only the NEXUS format is allowed; if autodetect function is used, the alignment will be converted to the NEXUS format automatically. When using the results of PartitionFinder2 or ModelFinder as input files for MrBayes, the alignment file and the best-fit model calculated will load into MrBayes automatically.
If the loaded alignment file contains a command block, you can select to run with this command block directly. The Outgroup(s) and Models parameters are enabled only after the alignment is loaded.
PhyloSuite provides a window to edit the partition file (activated by clicking Partition Models), in which you can input the name of the subset, the start and stop positions, and the best model for the subset. After editing, you can click the Generate Command Block button to generate the corresponding command block for the edited partition.
Sometimes, after finishing an analysis, you may decide that the results haven’t fully converged and that you would prefer to continue the analysis; for such circumstances, PhyloSuite provides the Continue Previous Analysis function, which allows you to continue any of your analyses (finished and unfinished) after setting the number of additional generations.
There are two ways to discard MCMC samples (not generations) when summary statistics are calculated: you can either set the specific number of samples (Burnin box) or the proportion (Burnin Fraction box) of all samples.
The Conformat parameter controls the format of the consensus tree, where Simple setting results in a simple consensus tree written in a format read by a variety of programs (TreeView, iTOL etc.); whereas Figtree setting results in a consensus tree formatted for the program FigTree, with rich summary statistics.
The Show MrBayes Data Block button allows you to add the parameters that are not included in the GUI or export the configured file and run in servers (such as CIPRES, see Brief example).
After inputting files and setting the parameters, you can either export the alignment and the corresponding command block to execute MrBayes separately (through Show MrBayes Data Block) or click Start button to run the program within the PhyloSuite. The run log can be viewed through the Show log button. Once the program is finished, the parameter settings and the citation for MrBayes will be saved in the summary.txt file.
5.12.1. Brief example
When you are in the PhyloSuite root folder, go to ‘example\MrBayes\mtDNA_36_genes\36_genes_NUC\normal’ folder (if you don’t have the newest example folder, please download it from here),
- Select
input.nexfile; - Open
Phylogeny-->MrBayesthrough the menu bar; - Drag it into the file input box;
- Select best-fit evolutionary model and associated parameters (+I, +G, etc.);
- Parameters can be set according to your own needs;
- Start the program.
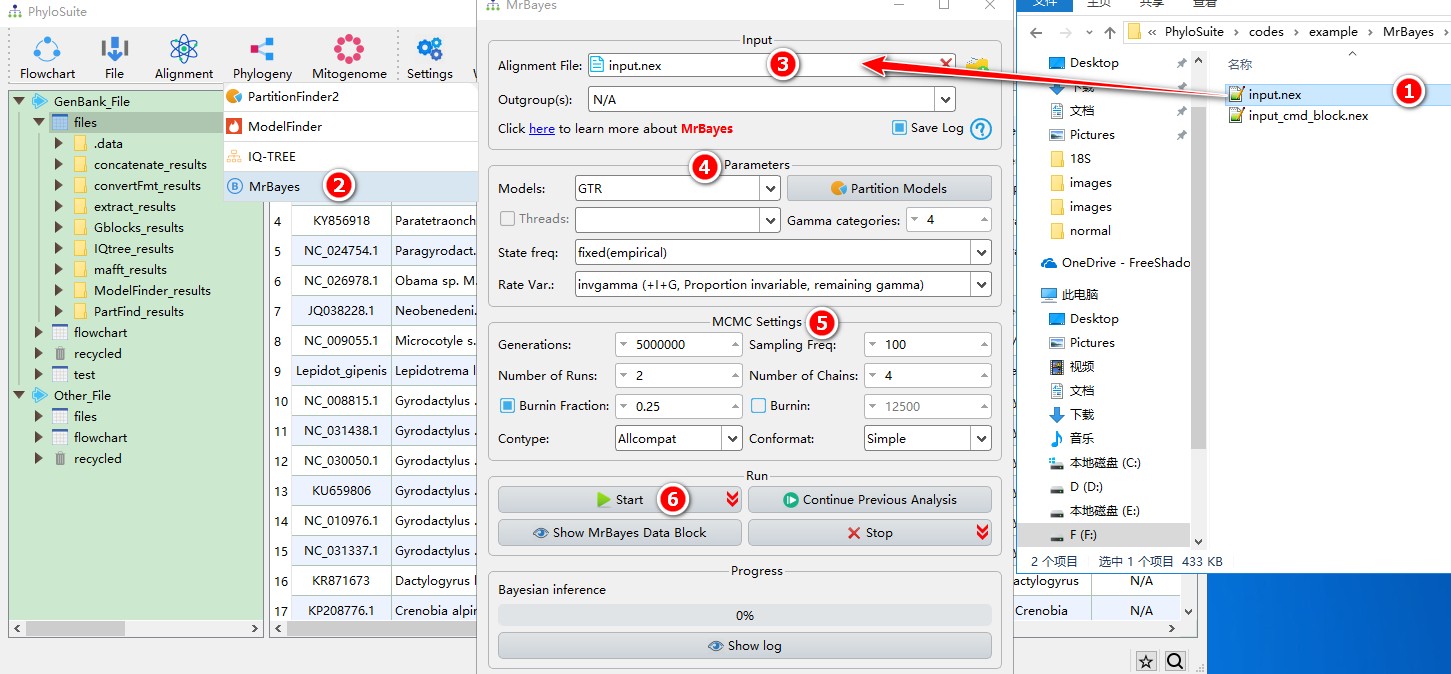
- If you want to export the settings to run MrBayes on CIPRES, click
Show MrBayes Data Block, then select ‘Save to File’, upload this file to CIPRES to run directly (remember to checkMy Data Contains a MrBayes Data Block).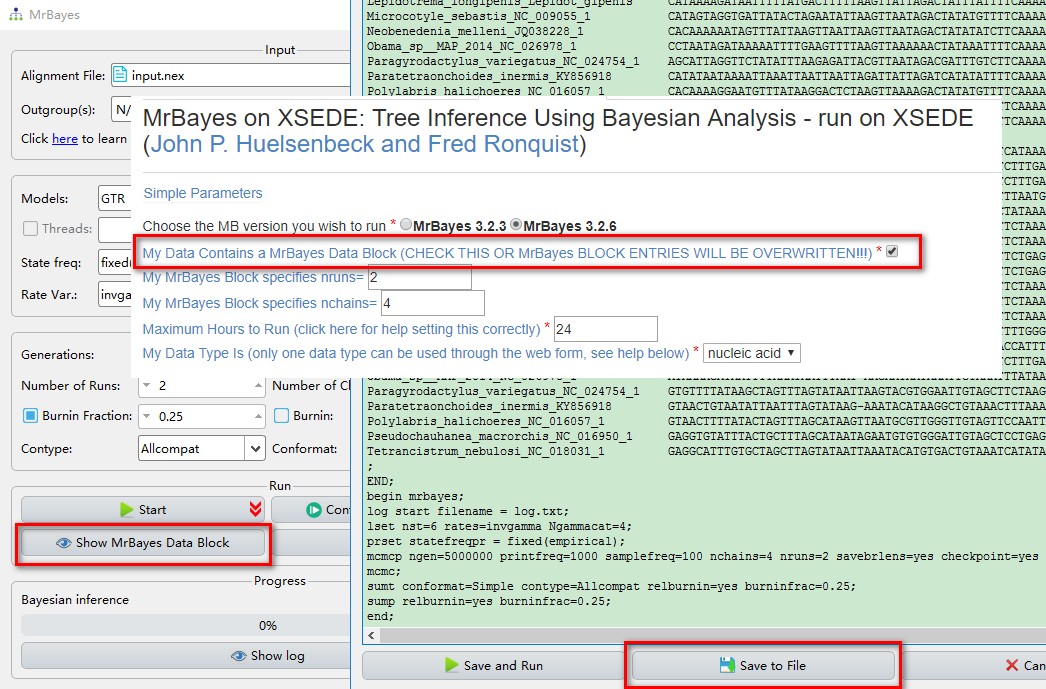
- If you want to view the tree and convergence diagnostics results when it is running, you can achieve this through the
Stop the run and infer the treeoption accessed via the dropdown arrow of theStopbutton.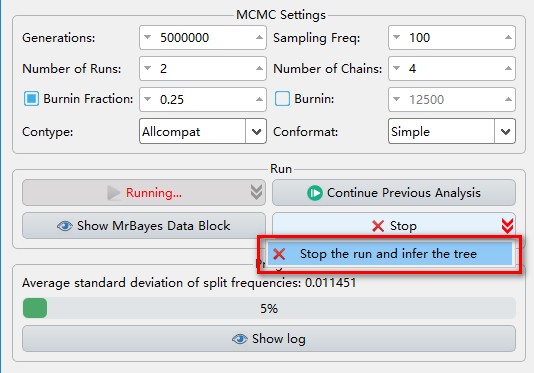
- If you wish to restart a previous run (unfinished or finished), click
Continue Previous Analysis.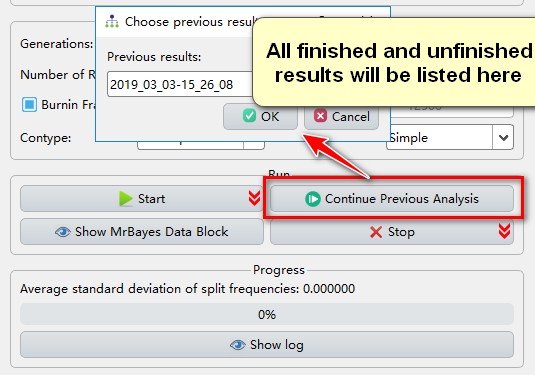
MrBayes can directly use the outputs of ModelFinder and/or PartitionFinder2, please see multi-gene tutorial and single-gene tutorial. For a comprehensive manual of MrBayes, please visit http://mrbayes.sourceforge.net/manual.php.
5.13. Flowchart
This function streamlines the procedure of evolutionary phylogenetics analysis, including the sequence alignment (MAFFT and MACSE), elimination of poorly aligned positions and divergent regions (Gblocks, trimAl and HmmCleaner), sequence concatenation (Concatenation), model selection (ModelFinder or PartitionFinder), and tree reconstruction (MrBayes and IQ-TREE). By default, PhyloSuite predefines seven different workflows, but you can also configure/delete your own workflows via the add button. These allow you to repeat your analyses quickly.
There are several things you should keep in mind when using this function:
- As shown in the figure below, the execution order of these programs is [
MAFFTand/orMACSE]–>[GblocksortrimAlorHmmCleaner]–>Concatenation–>[ModelFinderorPartitionFinder]–>[IQ-TREEandMrBayes].

- If you simultaneously choose
MAFFTandMACSE, protein-coding sequences should be used as input, and the results ofMAFFTwill be subsequently refined byMACSE - Only one of the three alignment optimization programs can be selected.
- Only one of the two model selection programs can be selected.
- Except for the model selection programs and
Concatenation, other programs do not have to be selected (whenMAFFT,MACSE,trimAl,HmmCleaner, orGblocksis selected,Concatenationmust be retained because it serves as a bridge that connects these programs with downstream programs, even for a single gene). - Only the first program requires an input file(s), whereas the input file(s) of other programs will be autodetected from the results of upstream analyses. Note that the two
Tree Reconstructionprograms can use either the results ofModelFinderorPartitionFinder, and they can run in parallel. - As the
Minimum Number Of Sequences For A Conserved PositionandMinimum Number Of Sequences For A Flank Positionoptions are enabled only when files are input directly into Gblocks, these two options are set by default to the most ‘relaxed’ values (i.e. lowest values) in the Flowchart mode, unless ifGblocksis the first program in a Flowchart analysis, in which case you can set the two options as you would normally. - For the model selection and tree reconstruction, if only
ModelFinderandIQ-TREEare selected,IQ-TREEwill use the best-fit model calculated byModelFinder; if onlyModelFinderandMrBayesare selected, thenMrbayesoption must be selected in theModel formenu ofModelFinder; and finally, ifModelFinder,IQ-TREEandMrBayesare selected, the results ofModelFinderwill be used only forMrBayes(thus it will use the same settings as described in the preceding note), whereasIQ-TREEwill first conduct the best-fit model selection inbuilt in the algorithm, and conduct the tree inference (using theAutooption in theModelsmenu, equivalent to-m TESTor-m MFP). - PhyloSuite also provides a function to check and autocorrect the parameters between selected programs, including those specified in the previous note, conflicting sequence types, conflicting partition modes, etc.
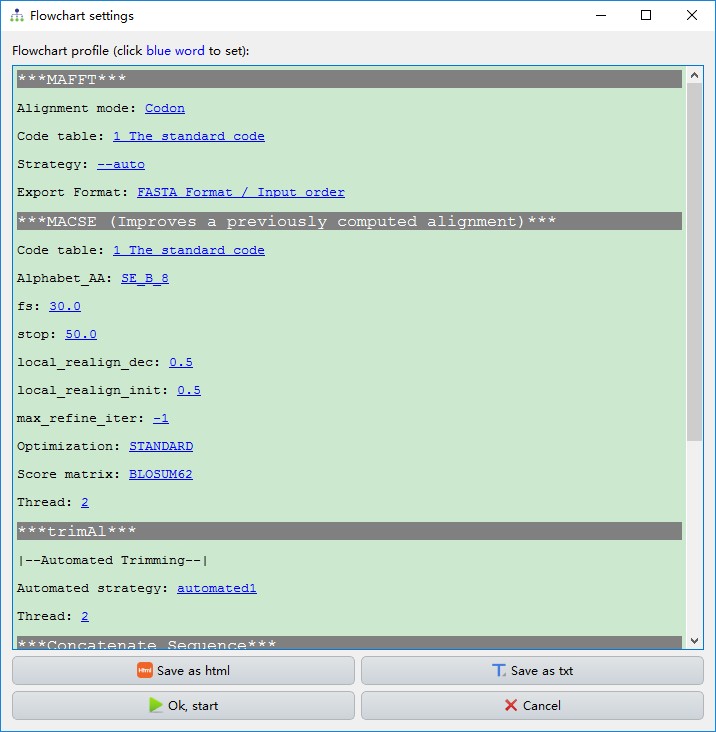
- When the flowchart is finished, the parameter settings and the citations of corresponding software programs will be summarized in the display area of the
flowchart.
5.13.1. Brief example
Tip: if you changed the workflow settings, remember to save it using the add button, otherwise, it will not be remembered. For comprehensive demos, please see multi-gene tutorial and single-gene tutorial.
5.14. Mitogenome
5.14.1. Parse annotations
This function can parse the annotations recorded in a Microsoft Word document (only *.docx extension is supported). When annotating the tRNAs, you should add the anti-codon of each tRNA gene to the end of the gene name (in brackets), for example: tRNA-Cys(GCA) (also see an example in the image below). Regarding the names of genes, PhyloSuite allows you to replace the name with other names by setting the Name from Word table accessed through the Configure name replacing button. Additionally, you can define the name of product qualifiers for each protein coding gene and the abbreviation of tRNA genes used for the organization table.
Example of mitogenome annotation in a Word document: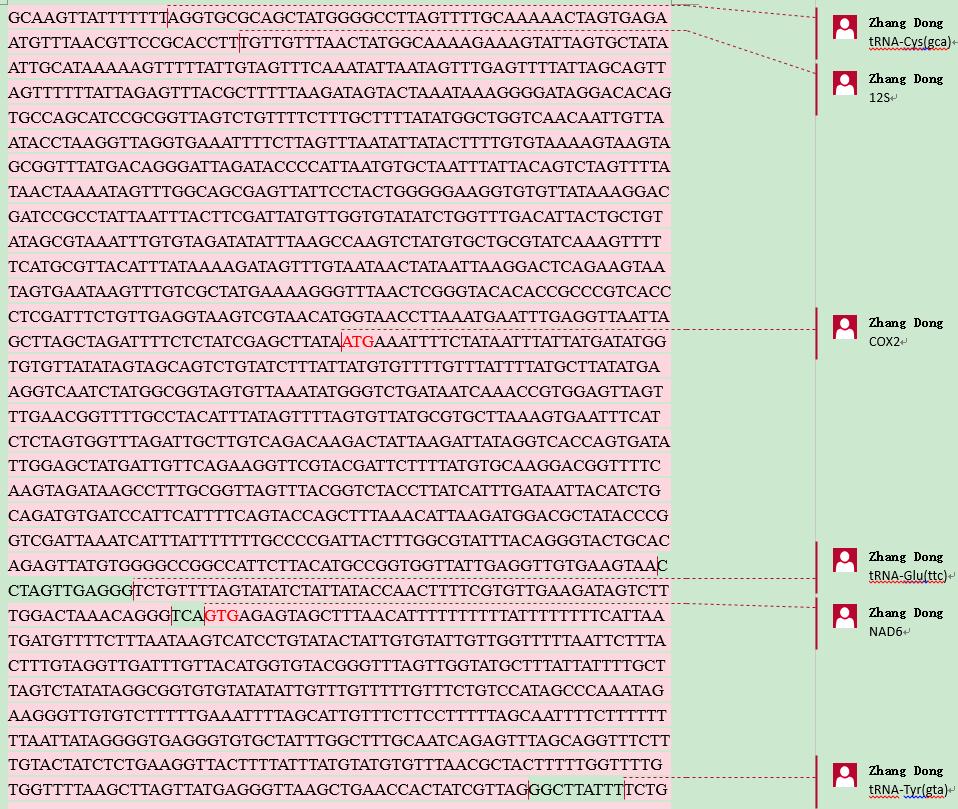
The GenBank Submission Template file including the information of authors and affiliations can be generated here. Several datasets from PhyloSuite can be used to generate the annotation section, including Organism, Strain, Lineage, etc. The Release Date parameter defines the release date of your sequence. Note that you should have office suite installed on your computer.
5.14.1.1. Brief example
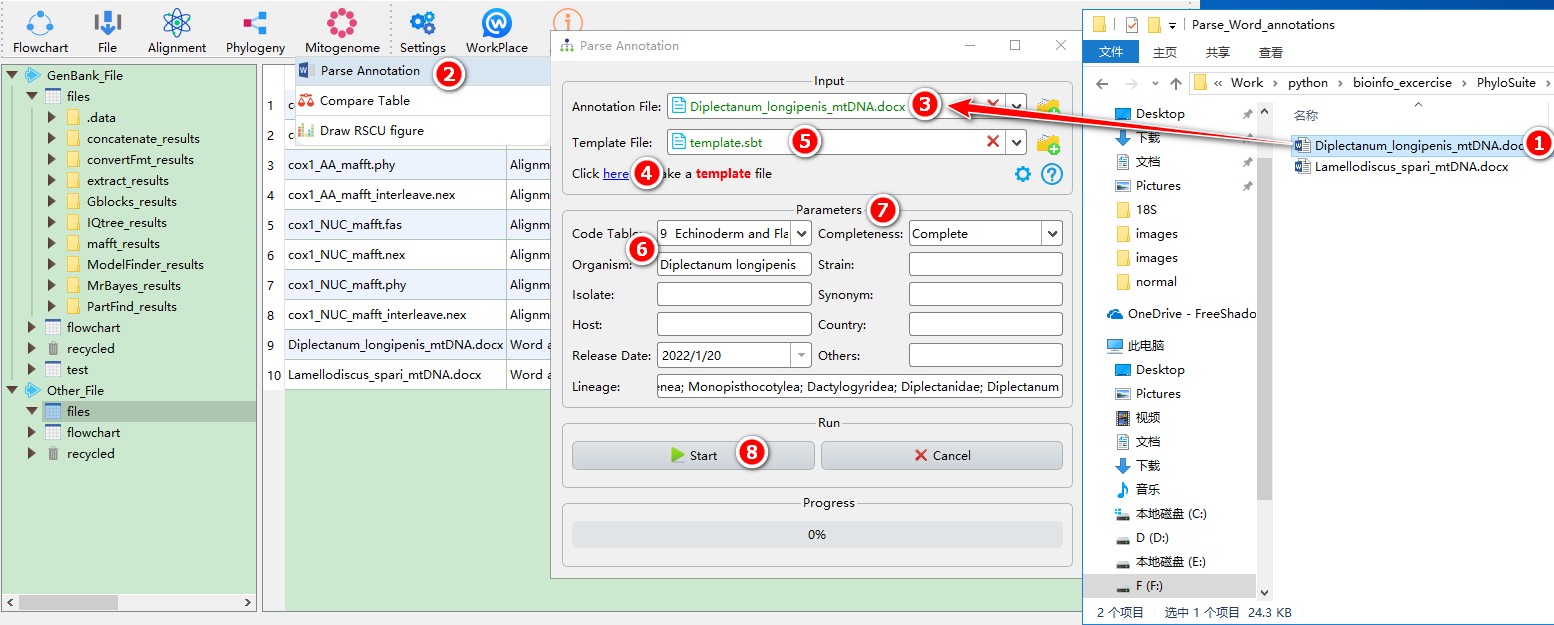
When you are in the PhyloSuite root folder, go to ‘example\Parse_Word_annotations’ folder (if you don’t have the newest example folder, please download it from here),
- Select ‘Diplectanum_longipenis_mtDNA.docx’ file (you can open this file to see how to annotate the sequence);
- Open
Mitogenome-->Parse Annotationthrough the menu bar; - Drag the file into the file input box;
- Click the blue word (as shown in figure) to generate a template file;
- Drag the template file into the
Template Fileinput box; - Fill in necessary information, such as
Organism,Lineage,Code Table, etc. - Other Parameters can be set according to your own needs;
- Start the program.
5.14.2. Compare tables
This function can compare and gather tables in the speciesStat subfolder under the extract_results folder. For organization tables, pairwise similarity calculation is allowed, in which MAFFT is invoked to make alignment and DistanceCalculator package in Biopython is used to calculate the identity of the sequence. The header of a table can be omitted from the comparison by selecting the number of rows you wish to exclude (from the top). For table examples, please see Table 1 in https://bmcevolbiol.biomedcentral.com/articles/10.1186/s12862-018-1249-3 and Table 2 in https://parasitesandvectors.biomedcentral.com/articles/10.1186/s13071-018-2910-9.
5.14.2.1. Brief example
This function can directly use the results of ‘extract’ function:
- Select the
extract_resultsfolder (if not available, please see here for how to make one, mitogenome datatype only); - Open
Mitogenome-->Compare Tablethrough the menu bar; - All extracted organization tables will be automatically imported; remove the tables you are not interested in using the
removebutton; - Check
Calculate pairwise similarityif you want to calculate pairwise similarity for homologous genes; - Start the program;
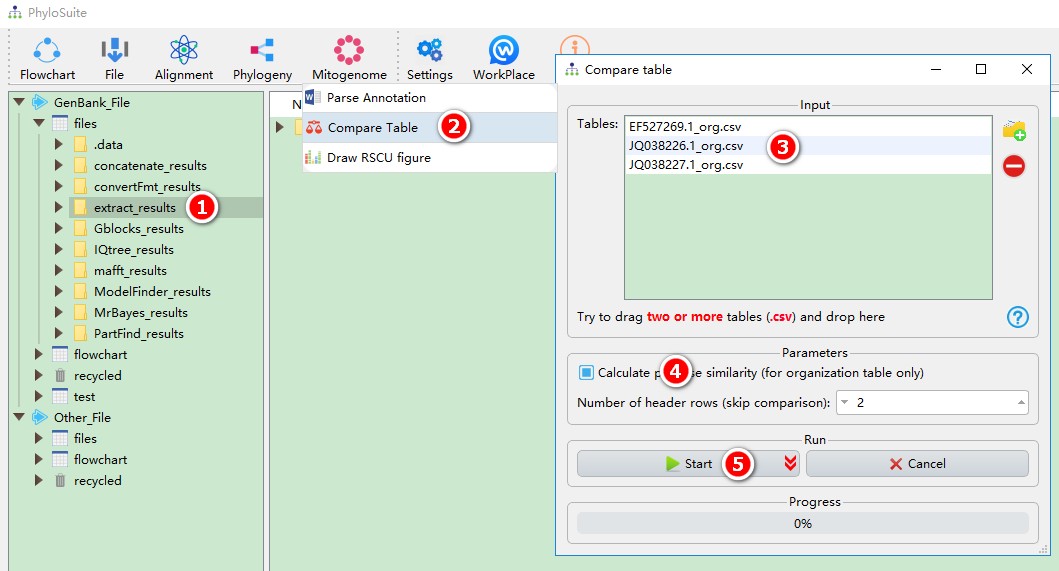
- If you want to compare nucleotide composition and skewness table (identified by no ‘_org’ in its name in the results folder), you should open the
extract_resultsfolder first, then enter ‘extract_results\StatFiles\speciesStat’, select interested files, drag them into theTablesbox, uncheckCalculate pairwise similarity, then Start the program.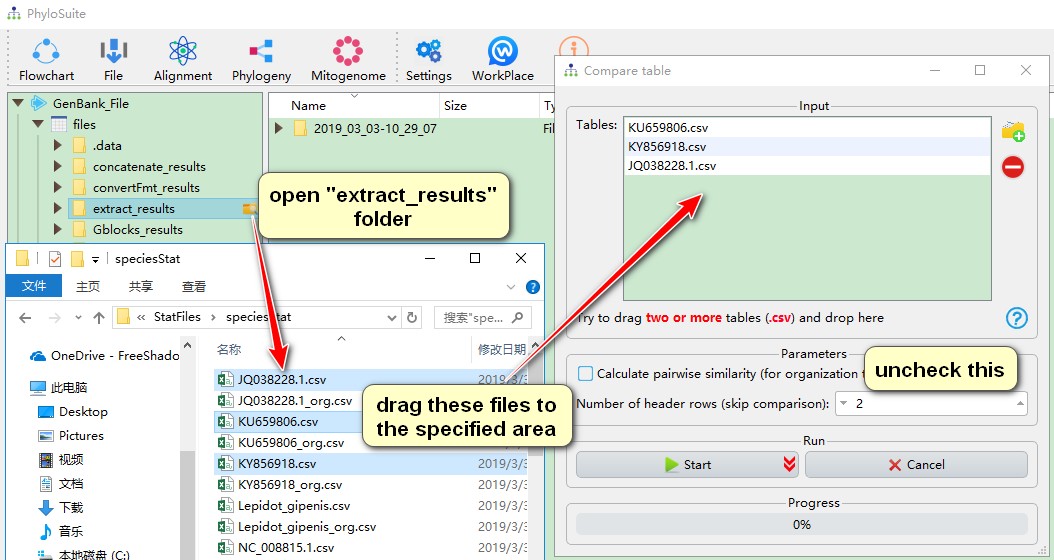
5.14.3. Draw RSCU figure
For the installation of Rscript, please see Plugins Installation section, and for the results please see Output Files section.
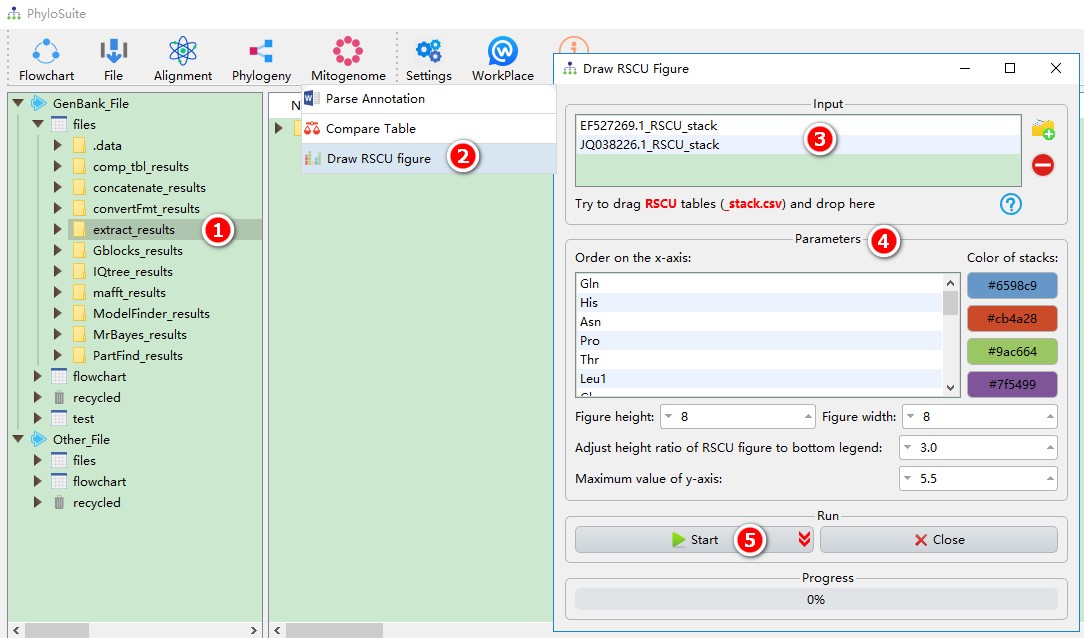
This function can draw an RSCU figure based on the tables in the “RSCU” subfolder under the extract_results/StatFiles/RSCU folder. You can drag to reorder the input files and the amino acids on the x-axis. For a figure example, please see Fig. 3 in https://parasitesandvectors.biomedcentral.com/articles/10.1186/s13071-017-2404-1.
5.14.3.1. Brief example
This function can directly use the results of ‘extract’ function:
- Select the
extract_resultsfolder (if not available, please see here for how to make one, mitogenome datatype only); - Open
Mitogenome-->Draw RSCU figurethrough the menu bar; - All extracted RSCU tables will be automatically imported, remove the tables you are not interested in using the
removebutton; - Parameters can be set according to your own needs;
- Start the program;
5.15. Molecular dating analysis
See http://phylosuite.jushengwu.com/PhyloSuite-demo/Molecular-dating-analysis/ or http://phylosuite.jushengwu.com/dongzhang0725.github.io/PhyloSuite-demo/Molecular-dating-analysis/
6. Citations and codes
If you use data generated by PhyloSuite in a scientific paper, please use the following citation:
Zhang, D., F. Gao, I. Jakovlić, H. Zou, J. Zhang, W.X. Li, and G.T. Wang, PhyloSuite: An integrated and scalable desktop platform for streamlined molecular sequence data management and evolutionary phylogenetics studies. Molecular Ecology Resources, 2020. 20(1): p. 348–355. DOI: 10.1111/1755-0998.13096.
Please also note that PhyloSuite is a plug-in program, and that you should also cite any (and every) plug-in program not designed and compiled by us that you use in your analyses. This applies to the following plug-ins:
MAFFT
Katoh, K., and Standley, D.M. (2013). MAFFT multiple sequence alignment software version 7: improvements in performance and usability. Mol Biol Evol 30, 772-780.
MACSE
Ranwez V, Douzery EJP, Cambon C, Chantret N, Delsuc F. 2018. MACSE v2: Toolkit for the alignment of coding sequences accounting for frameshifts and stop codons. Mol Biol Evol. 35: 2582-2584. doi: 10.1093/molbev/msy159.
Gblocks
Talavera, G., and Castresana, J. (2007). Improvement of phylogenies after removing divergent and ambiguously aligned blocks from protein sequence alignments. Syst Biol 56, 564-577.
trimAl
Capella-Gutierrez S, Silla-Martinez JM, Gabaldon T. 2009. trimAl: a tool for automated alignment trimming in large-scale phylogenetic analyses. Bioinformatics. 25: 1972-1973. doi: 10.1093/bioinformatics/btp348.
HmmCleaner
Di Franco A, Poujol R, Baurain D, Philippe H. 2019. Evaluating the usefulness of alignment filtering methods to reduce the impact of errors on evolutionary inferences. BMC Evol Biol. 19: 21. doi: 10.1186/s12862-019-1350-2.
IQ-TREE
Nguyen, L.T., Schmidt, H.A., von Haeseler, A., and Minh, B.Q. (2015). IQ-TREE: a fast and effective stochastic algorithm for estimating maximum-likelihood phylogenies. Mol Biol Evol 32, 268-274.
PartitionFinder2
Lanfear, R., Frandsen, P.B., Wright, A.M., Senfeld, T., and Calcott, B. (2017). PartitionFinder 2: new methods for selecting partitioned models of evolution for molecular and morphological phylogenetic analyses. Mol Biol Evol 34, 772-773.
MrBayes
Ronquist, F., Teslenko, M., van der Mark, P., Ayres, D.L., Darling, A., Höhna, S., Larget, B., Liu, L., Suchard, M.A., and Huelsenbeck, J.P. (2012). MrBayes 3.2: efficient Bayesian phylogenetic inference and model choice across a large model space. Syst Biol 61, 539-542.
For the remaining functions, we mostly used our own Python codes, written in Python 3.6.7 and PyQT5. Biopython package was used for some functions, such as feature extraction from GenBank files, which is conducted using SeqIO module.
Cock, P.J., Antao, T., Chang, J.T., Chapman, B.A., Cox, C.J., Dalke, A., Friedberg, I., Hamelryck, T., Kauff, F., Wilczynski, B., et al. (2009). Biopython: freely available Python tools for computational molecular biology and bioinformatics. Bioinformatics 25, 1422-1423.
7. Troubleshooting
7.1. Update failed: how to revert to previous settings and plugins
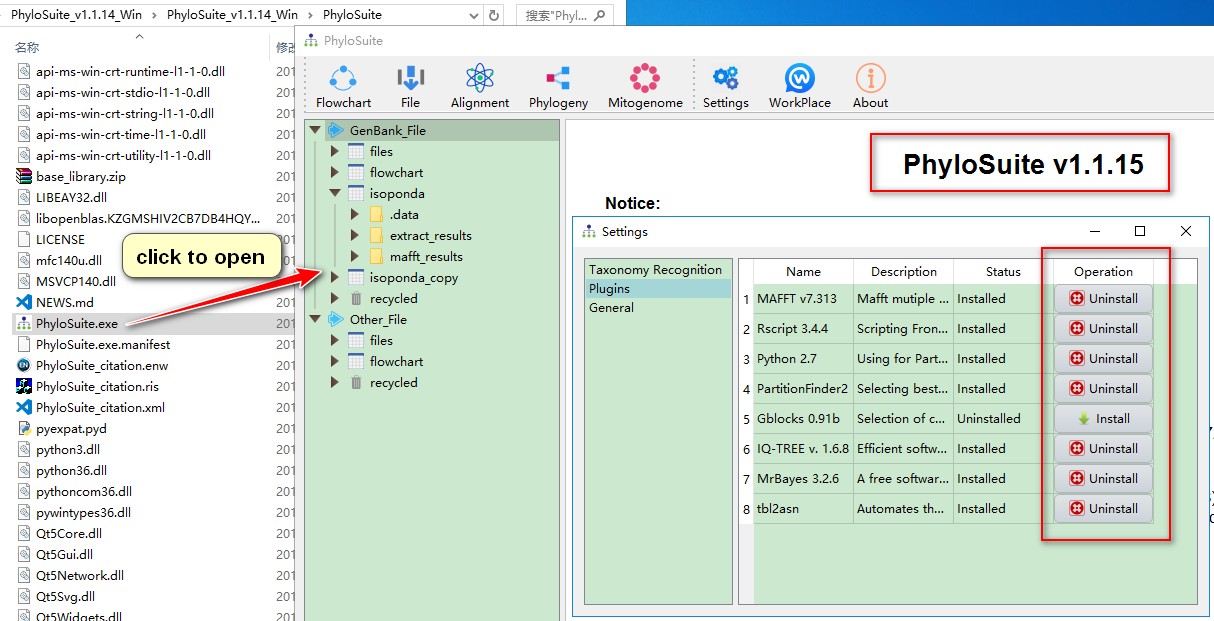
In some rare cases, users may encounter errors when updating PhyloSuite. As this may cause losing some of your settings and configurations, here we will demonstrate how to revert your settings and plugins to the state before update.
- First you should download the latest PhyloSuite package at https://github.com/dongzhang0725/PhyloSuite/releases or http://phylosuite.jushengwu.com/dongzhang0725.github.io/installation/#Chinese_download_link (China). Note: for Windows, you should download
PhyloSuite_xxx_Win.rar, instead of the installer file.
| System | Package file |
|---|---|
| Windows | PhyloSuite_xxx_Win.rar |
| Linux | PhyloSuite_xxx_Linux.tar.gz |
| Mac OSX | PhyloSuite_xxx_Mac.zip |
Unzip the package, select and copy all files, go to the installation path of PhyloSuite, open the
PhyloSuitefolder, paste the copied files directly into this folder (if prompted so, confirm that you wish to replace files with the same name).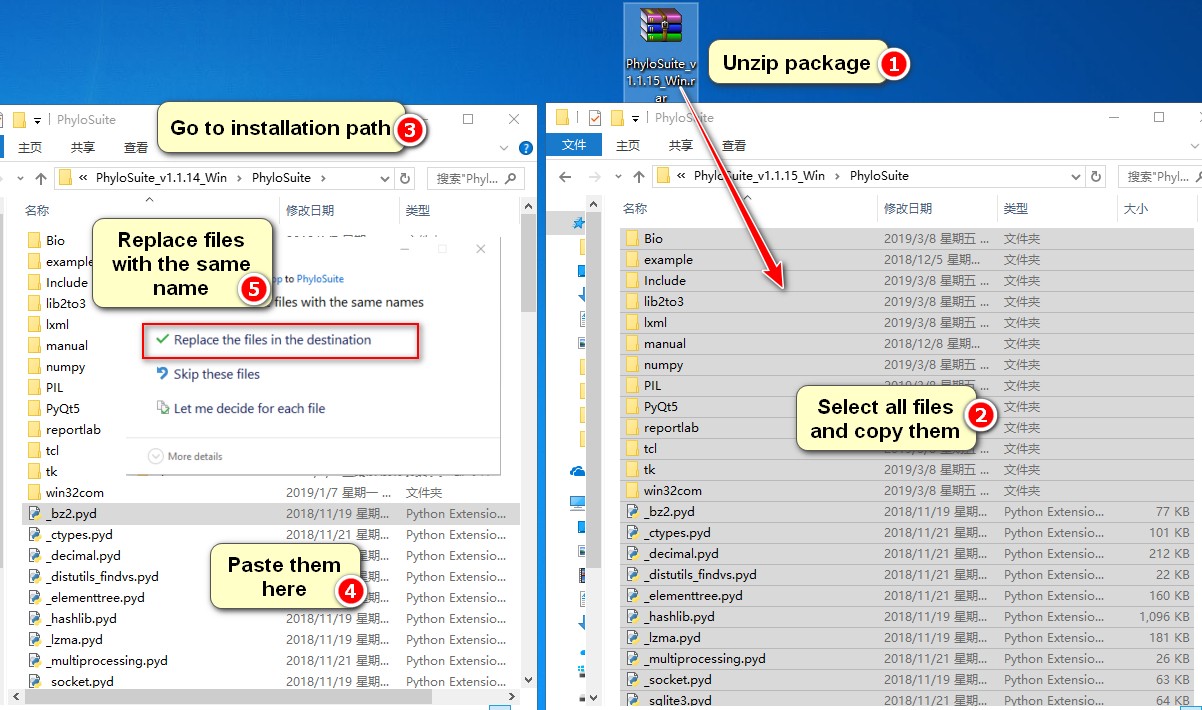
Open PhyloSuite, you should find that you are running an updated version, and that your previous settings have been retained.
7.2. PhyloSuite run failed
If the execution of PhyloSuite fails, please first try shutting down your antivirus program.
7.3. MrBayes does not work
Sometimes MrBayes will finish immediately, without reporting an error. Generally you can try to find the problem by executing MrBayes in the terminal:

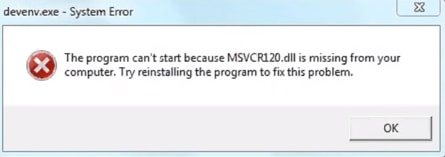
If you get ‘msvcr120.dll is missing’ error in Windows, you can fix it via this solution.
For other problems, please search the error code in the website.
7.4. PhyloSuite get stuck
If PhyloSuite become more and more stuck, this may be caused by the increasing data in a workplace. To settle this problem, you should create a new workplace. Generally, PhyloSuite encourage user to create multiple workplaces to preserve their work.
7.5. MAFFT error
If you encounter errors with MAFFT, such as:
/usr/bin/awk: cannot execute binary file-gt: unary operator expectedoptions: check source file
please try the following steps:
- Reinstall MAFFT from the official website: https://mafft.cbrc.jp/alignment/software/.
- Specify the MAFFT executable file in PhyloSuite. For detailed instructions, see How to configure plugins in PhyloSuite.
- Important: For MAFFT, make sure to specify the
mafft.batfile as the executable in PhyloSuite.
7.6. Cannot run PhyloSuite on MAC
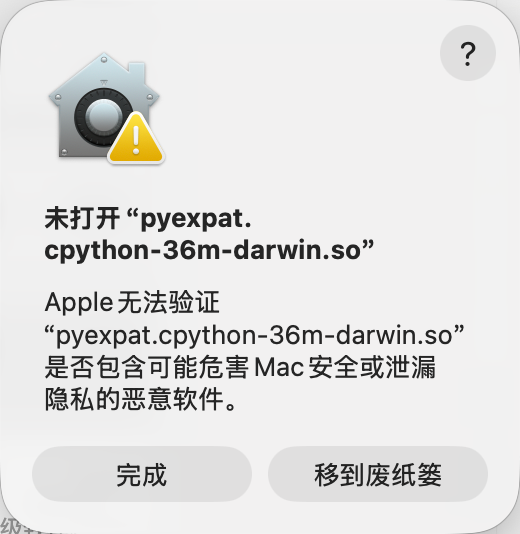
For macOS users, if you encounter Security & Privacy restrictions or an alert such as “Apple cannot verify “xxx file”, you can try resolving the issue with the following command:
1 | sudo xattr -rd [PhyloSuite_installation_path]/PhyloSuite |
8. Acknowledgements
We would like to thank Dr. Meng Kai-Kai for helping us to set up the chloroplast genome extraction function.