Single gene phylogeny
PhyloSuite: from data aquisition to phylogenetic tree annotation (single gene tree building)

In order to make it easier for users to get started, here is a tutorial to briefly introduce the use of PhyloSuite, using 51 ciliate 18S sequences as an example (https://onlinelibrary.wiley.com/doi/full/10.1111/j.1550-7408.2009.00413.x).
1. Sequence download and preparation
The accession numbers we will use are below (fetched from a table in the abovementioned paper):
1 | AF164122 X65150 AY547546 U17356 EU286810 |
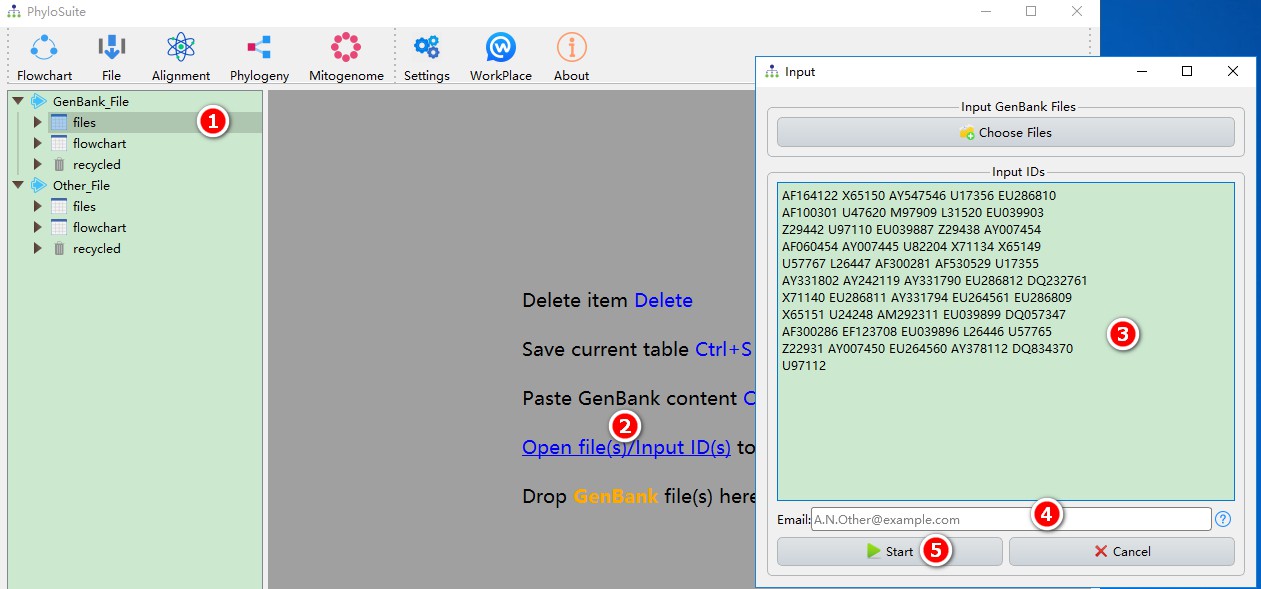
First, download these IDs to the PhyloSuite workspace:
- Select any of the work folders (here I chose ‘files’);
- Click Open file(s)/Input ID(s) to open the input window.
- Copy the above IDs into the text box (spaces, line breaks, tabs, etc. are supported as separators);
- Enter your email (tell NCBI who is downloading the sequences);
- Click Start to download.
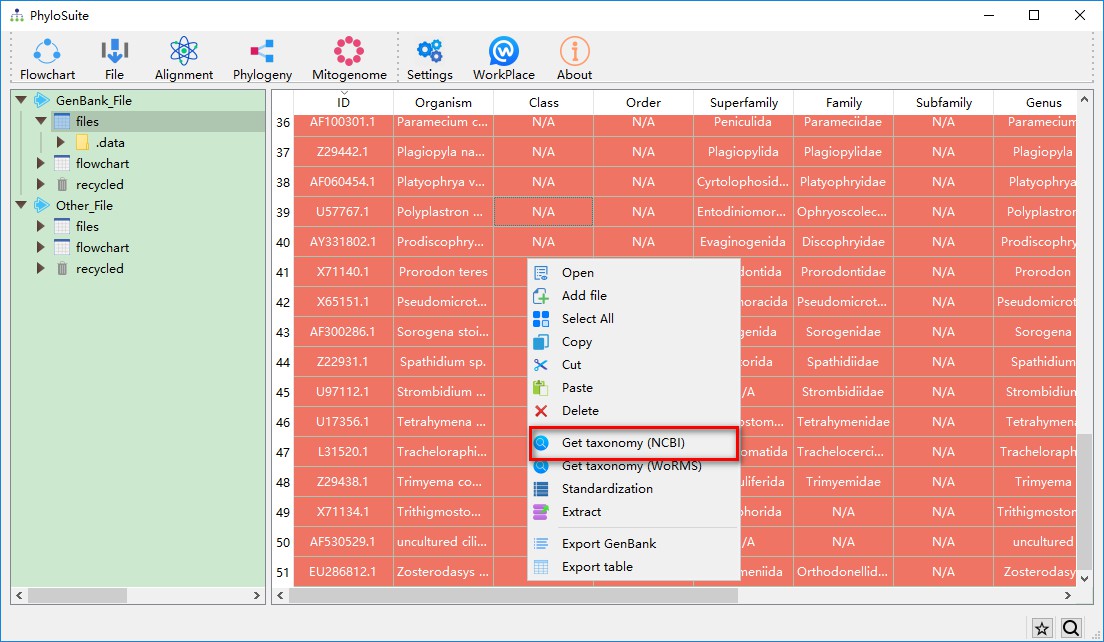
After the sequence is downloaded to the workspace, we find that some taxonomic groups are designated as N/A, indicating that the taxonomic group is not recognized. Select all sequences (CTRL+A), then right-click, and select Get taxonomy (NCBI). You will get a prompt after the selection asking to confirm that you are sure that you wish to replace the current taxonomy with the taxonomic information from NCBI’s taxonomy database (this is important for subsequent phylogenetic tree annotation).
After the above steps are completed, there may still be some IDs that are not recognized, indicating their taxonomic group is not in the latest NCBI’s taxonomic classification system. You may also wish change the current names manually, in which case you can double-click the corresponding cell and enter the correct taxonomic group name.

2. Sequence extraction
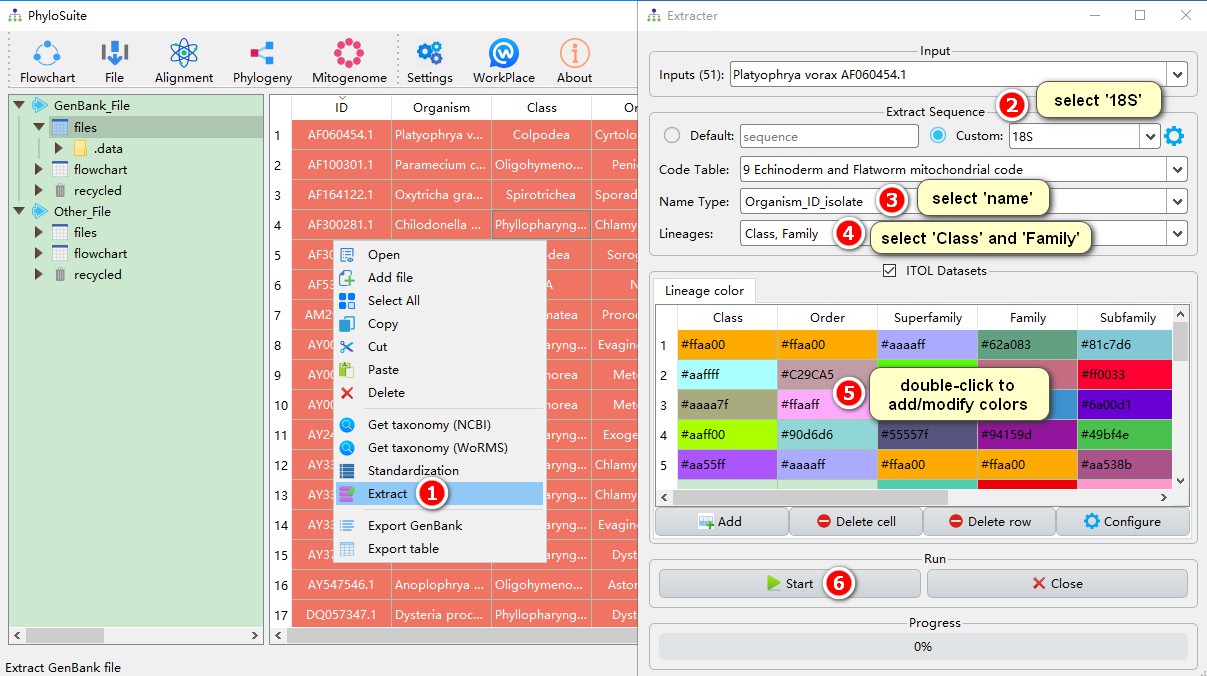
Select all sequences (Ctrl+A) and open the context menu (right-click).
- Choose Extract
- Since we are extracting 18S sequences, we select 18S here;
- Choose the name-type you wish to use for each sequence: organism, ID, isolate, etc..
- Select the taxonomic categories relevant for your study; in this case it is ‘class’.
- Here you can select colors to designate taxa in the phylogenetic tree in iTOL. Double-click to modify the color. If the number of colors that you set is lesser than the number of studied taxonomic groups, random colors will be assigned to the remaining taxa. For example, there are 11 classes, and I only set 5 colors, so the remaining 6 classes will use random colors;
- Click Start to run the Extraction function.
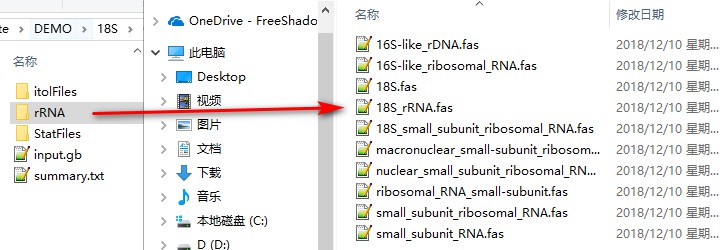
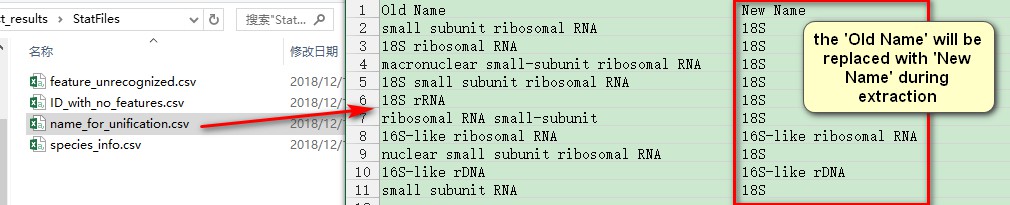
After the extraction, open the extract_results/rRNA folder (the feature identity of 18S is rRNA, so the folder name is rRNA). We can see that different entries use different names for 18S, so we need to unify the names first.
Open the extract_results/StatFiles folder, find the name_for_unification.csv file, change the name to 18S in the New Name column, and save (you must save as csv format). As I am not sure that 16S-like entries are homologous to 18S, I will leave them unchanged.
Then go back to the window to extract the sequence
- Click the Settings button next to the sequence type to enter the settings interface;
- Drag the modified
name_for_unification.csvfile into the area indicated in the figure, and the modified names will be automatically recognized.
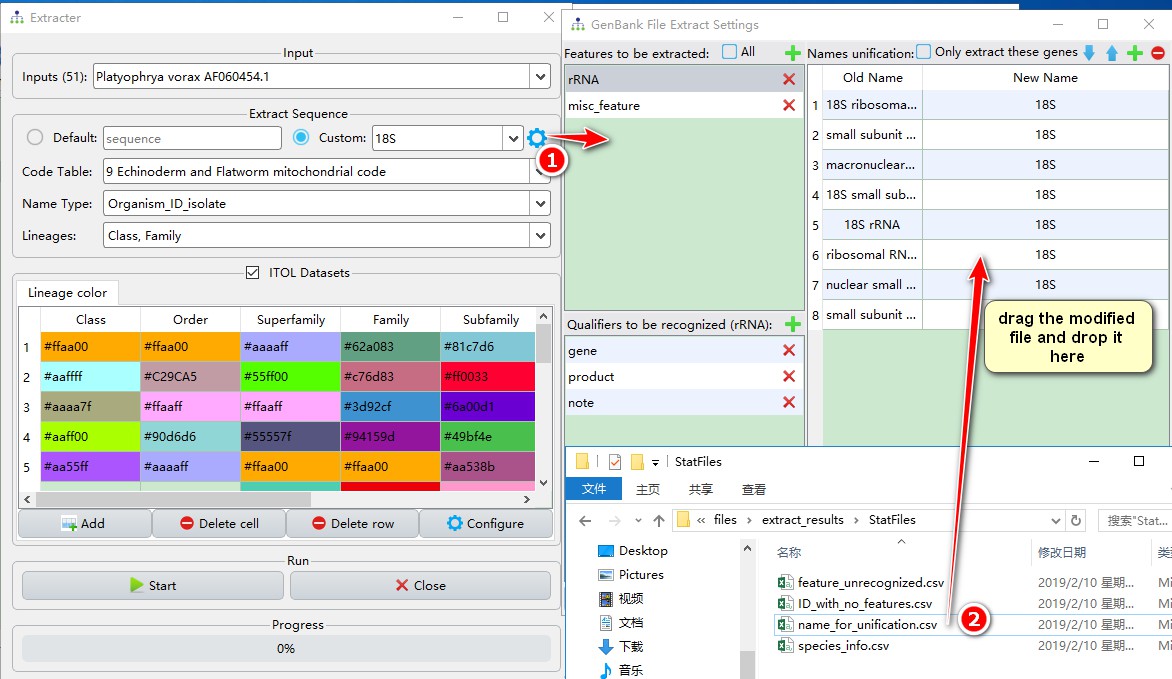
Just close the settings window, your new settings will be automatically saved. At this point, you only need to re-run the extraction anew to get the 18S sequence after replacing the name. After reopening the 18S.fas file in the rRNA folder, you will find only 42 sequences in it (remember we have a total of 51 IDs). Three more sequences, annotated as 16-like, are in the same folder. Because I wasn’t sure that these are homologues, I left them in a separate file so I can manually revise their homology. If you are certain, you can rename them to 18S as described above. The extraction of the remaining 6 missing sequences was not successful, the details of which can be found in the ‘StatFiles’ folder in files: StatFiles/feature_unrecognized.csv and StatFiles/ID_with_no_features.csv. Best way to see what went wrong is to open these sequences (main working window, find the ID, right-click, open) and compare them with successfully extracted files. Once/if you figure out what is wrong with them, you may manually edit these files in a text editor, save them, and re-extract all sequences.
However, if you are confident that all the sequences are 18S, here is an easy way:
- Check ‘Default’ instead of ‘Custom’ in the Extracter function and set the output file name;
- Start to extract.
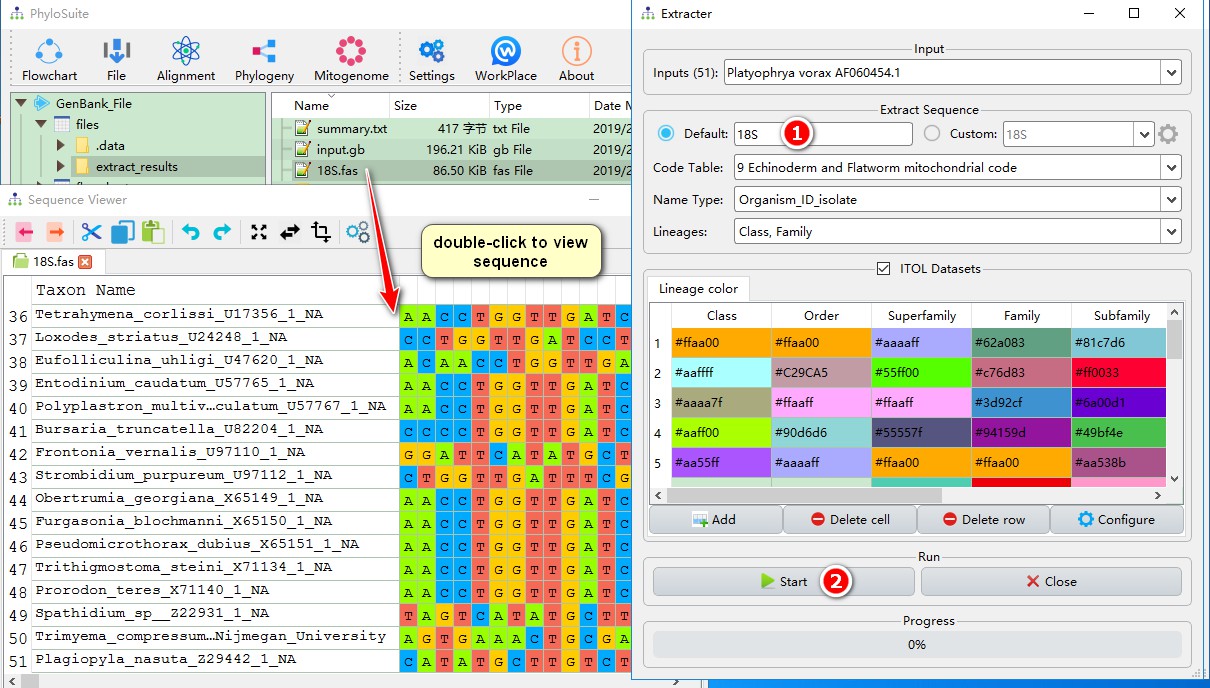
Double-clicking the “18S.fas” file will open the sequence viewer, where you will see that all 51 sequences were successfully extracted.
3. Multiple sequence alignment
Now that we have extracted all sequences, we can start the phylogenetic analysis. For this, we have to align them first using MAFFT. There are many ways to do this, only two of which will be shown here.
First, select the
extract_resultsfolder in the main PhyloSuite window (extracted in the previous step), and then open MAFFT throughAlignment-->MAFFTin the menu bar. The extracted sequences will be automatically imported into MAFFT;
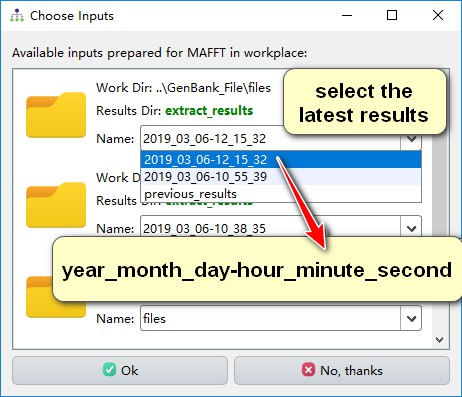
You can select MAFFT from the Alignment menu, and then a pop-up window will automatically offer you available input file from the entire workspace. Scroll through them to find the results that you need, or click ‘No, thanks’ and select the input file manually.
You will find that other plug-ins in PhyloSuite also use this interface to import files.
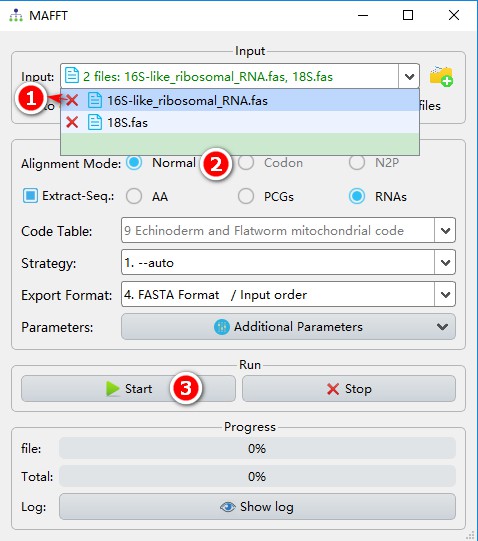
Next is the sequence alignment
- First you may choose to delete the 16S sequence files using the delete button (the button next to it can be used to view the sequence).
- Align the sequences using Normal mode;
- Other parameters can be set according to your own requirements; and then click Start.
After the alignment is completed, you can view the sequence and modify them.
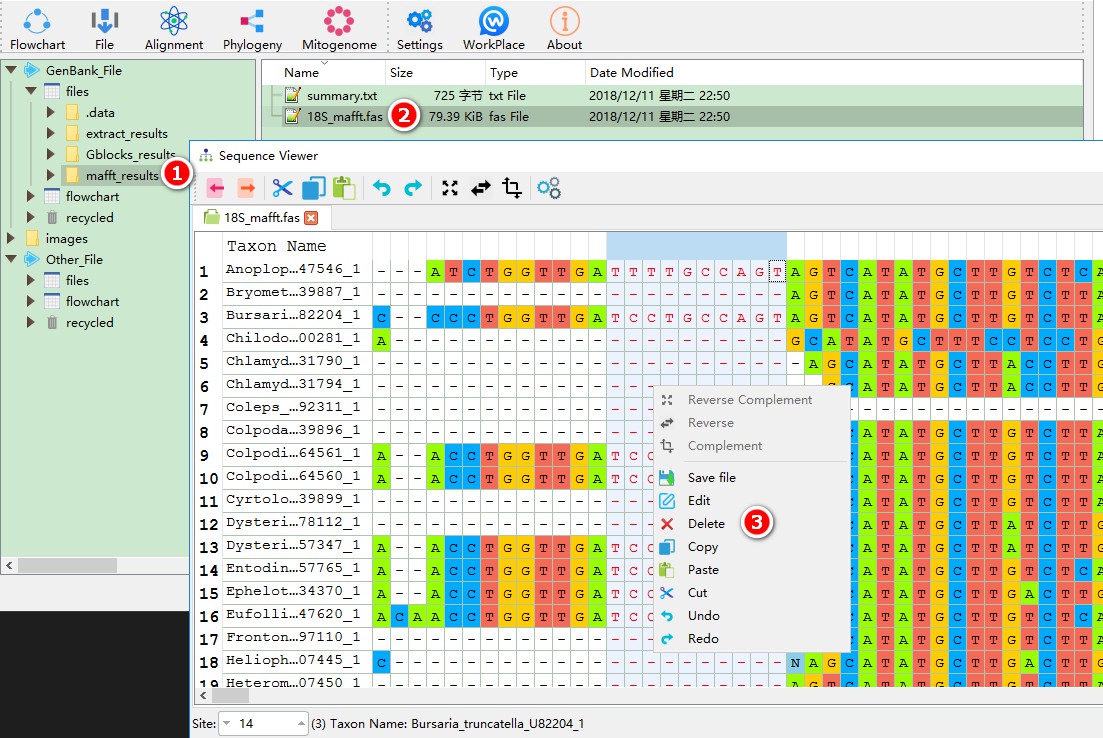
- Select the
mafft_resultsfolder; - Double-click the alignment result to open it in the sequence viewer.
- If necessary, manual correction of the sequence can be performed in the same way as in MEGA.
4. Nucleotide replacement model selection
Next is the evolution model selection. Since ModelFinder does not recognize the results of MAFFT automatically (Concatenation function ordinarily serves as a bridge between these two functions, but we won’t use it for a single-gene dataset), we need to manually import it. The operation is also simple:
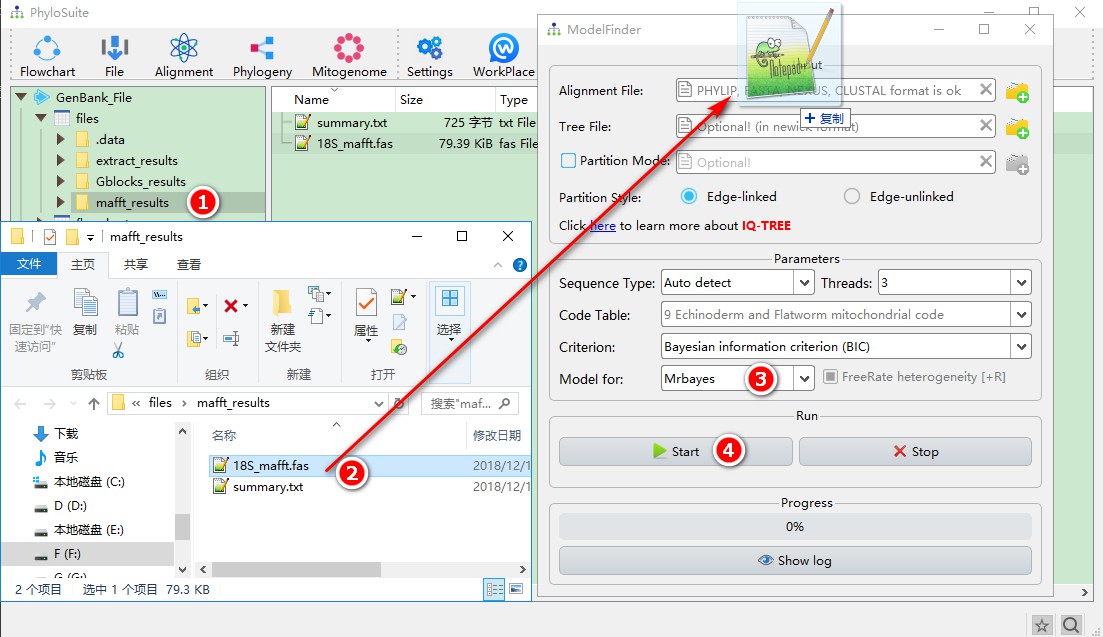
- Double-click
mafft_resultsto open the folder; - Open the ModelFinder software window via
Phylogeny-->ModelFinderin the menu bar and drag the aligned 18S sequence into the file input box of ModelFinder. - Select
MrbayesinModel forto select the optimal models forMrbayes; - Other parameters can be selected according to your needs. After settings, you can click
Startto start the program.
5. Phylogenetic tree reconstruction based on Bayesian Inference (BI)
- Double-click
*.iqtreein theModelFinder_resultsfolder to view the selection result of the optimal model; - Select the
ModelFinder_resultsfolder in the main PhyloSuite interface; - Open the Bayesian software
Phylogeny-->MrBayesfrom the menu bar; - You can see that the alignment and model selection results have been automatically imported into
MrBayes. You may choose to select one or more outgroups through theOutgroupdrop-down menu; - Select the number of generations you wish to run;
- Set other parameters if you wish to do so; and then click
Start.

6. Phylogenetic tree reconstruction based on the Maximum Likelihood method (ML)
IQ-TREE is able to select the best-fit model and conduct phylogenetic analysis, you can complete both in one step.
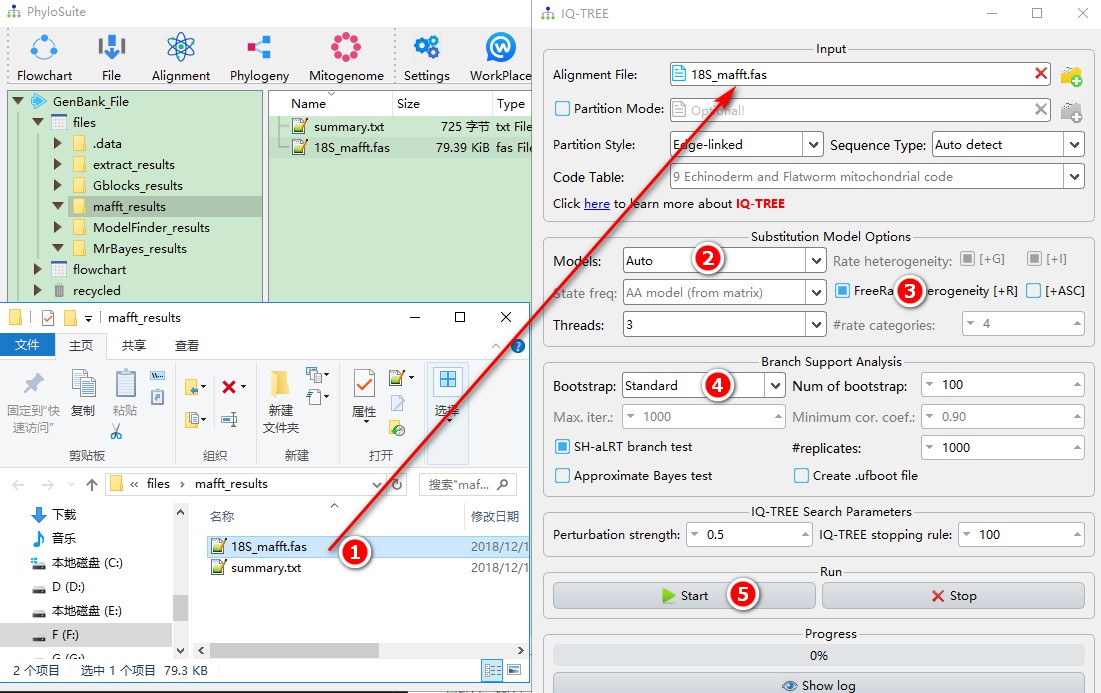
- Drag the aligned sequences (*.fas) directly into the IQ-TREE file input box.
- By selecting the
Automodel, you are allowing IQ-TREE to select the optimal evolutionary model first, and then use it to conduct the phylogenetic analysis; - You can choose +R to calculate the FreeRate model, which is recommended by the IQ-TREE author;
- Since 18S is small, it is best to use the standard bootstrap method based on the author’s recommendation;
- Other parameters can be selected according to your needs; then run it by clicking
Start.
7. Flowchart
In addition to the above-mentioned conventional operation, PhyloSuite also provides a streamlined workflow mode that allows to conduct the analysis described above (sections 3 to 6) in a single go. You only need to input the file in the first program (MAFFT) and the remaining steps will be executed automatically in the default order: alignment–>concatenation–>model selection–>reconstruct the phylogenetic tree; with results of the upstream program being used as the input file for the downstream program.
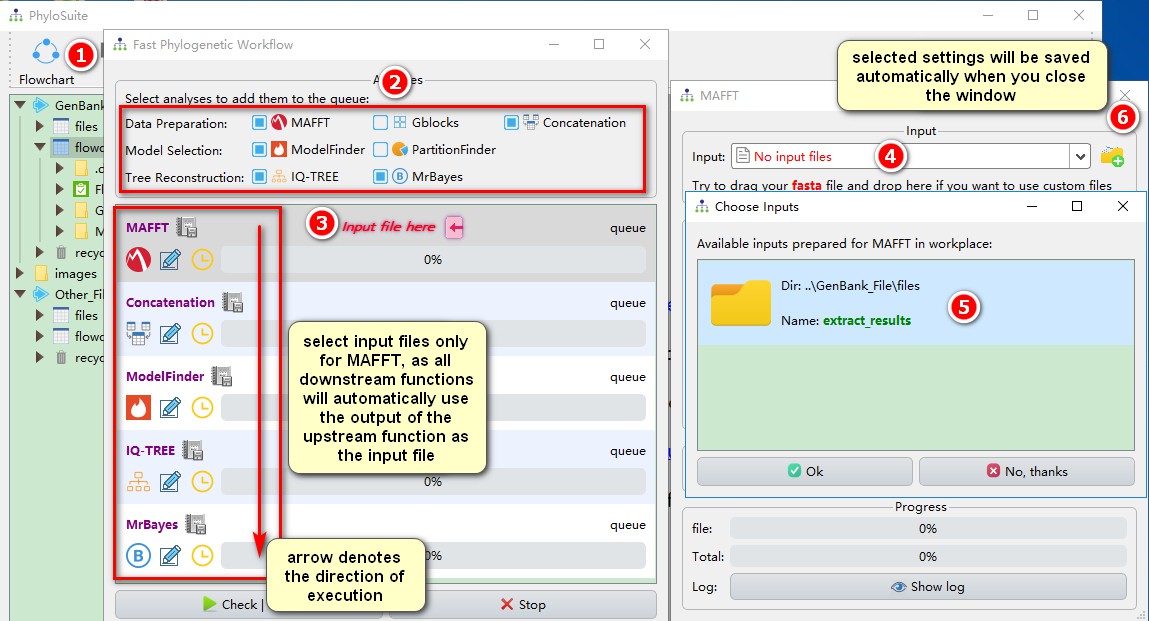
- Click
Flowchartin the menu bar to open the program window; - Select the analyses you want to conduct; here it will be
MAFFT,Concatenation(although it is a single gene, the Concatenation must also be selected, because the downstream programs can only recognize concatenated results as input files, in this way, the Concatenation function served as format convertion),ModelFinder,IQ-TREE, and MrBayes; - Click on the red
Input file hereto open the MAFFT program window; - Click on the MAFFT file input box select one of the automatically prepared input files (see section 3 for details);
- Select the extraction results from before (note that I only kept 18S);
- Just close the window and MAFFT will automatically save the input file and the parameters that you set (also applied to other programs).
After inputting the file into the MAFFT and setting the parameters, you may also wish to set the parameters for other programs.
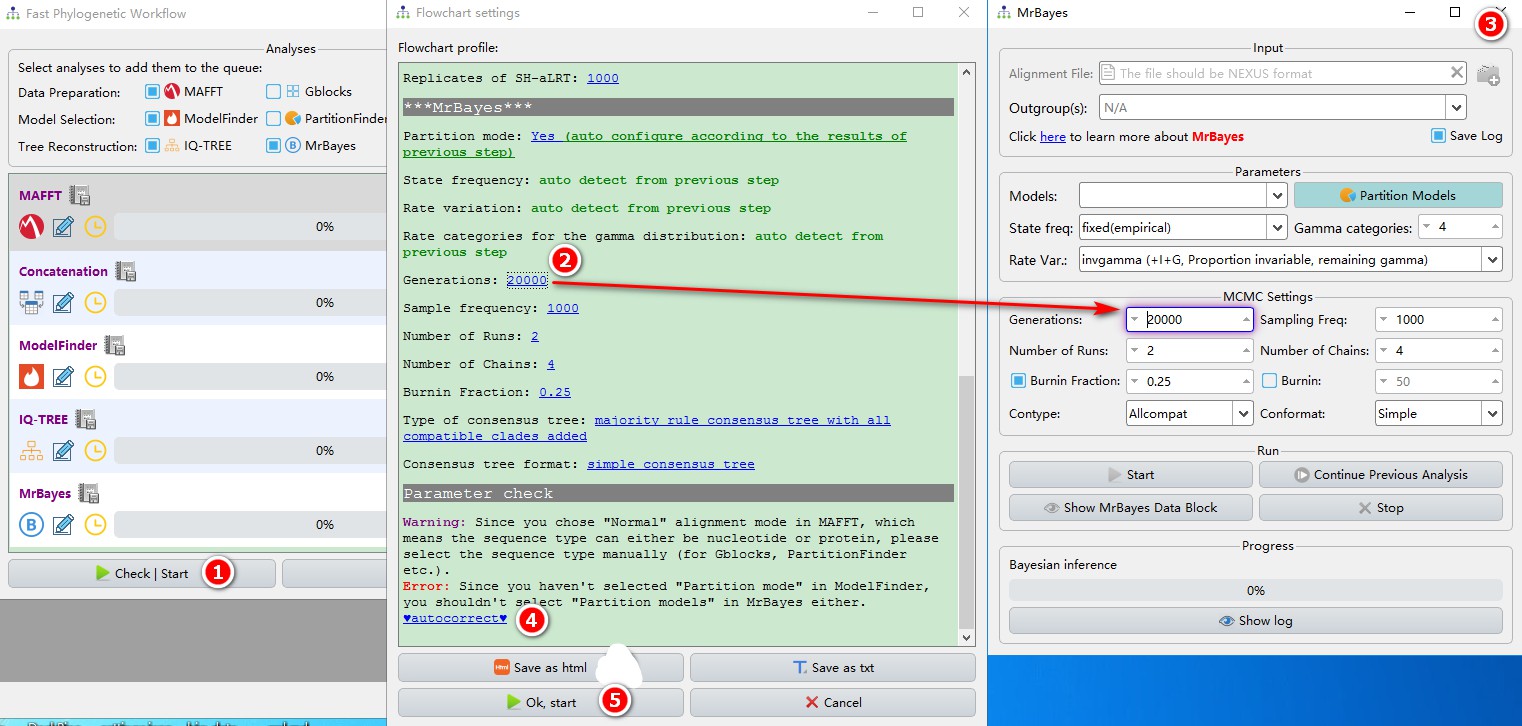
- Click the
Check | Startbutton, and a parameter summary window will pop up, allowing you to modify and check the parameters; - Click the blue words to set the parameters (the corresponding widgets will be highlighted in the pop-up window);
- After setting the parameters for each software, just close the window to save the settings;
- PhyloSuite also provides the ability to automatically check the conflicting parameters. For example, if the model selected by Modelfinder does not use partition model, you should also turn off partition mode for
MrBayes. Clickautocorrectto do this automatically. - After the parameters are checked (note that for the demo purpose, we chose very short running times for MrBayes and IQ-TREE), you can click
Ok, startto start the program.
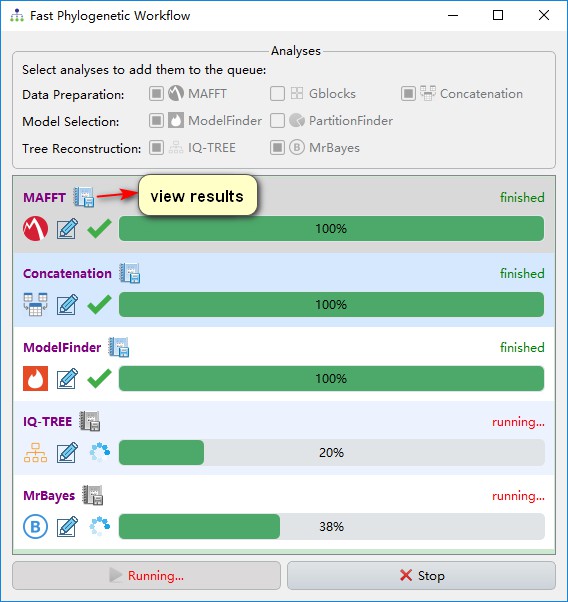
IQ-TREE and MrBayes programs can be run simultaneously (they don’t have upstream/downstream program relationship). After a program has finished, you can view the results by clicking the button next to the program name.
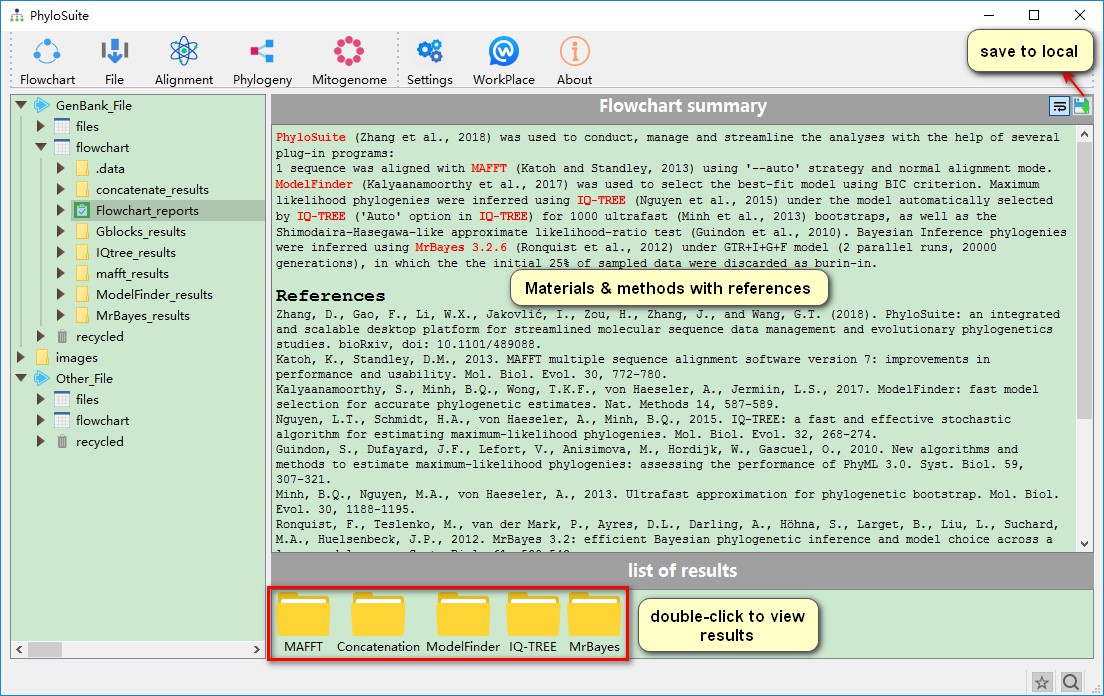
After all the programs have finished, the main interface will give you a summary description of the operation, as well as references to the software used, both of which can be useful for writing the Materials & Methods section of your manuscript.
8. Phylogenetic tree annotation
After phylogenetic tree reconstruction, the last step is to annotate the phylogenetic tree. Here we will use the results of IQ-TREE as an example.
1. First open iTOL’s home page https://itol.embl.de/, log in to your account, and select My Trees;
2. Double-click IQtree_results to open the tree of the IQ-TREE, and drag the *.treefile file into the area shown in the figure to automatically import the phylogenetic tree;
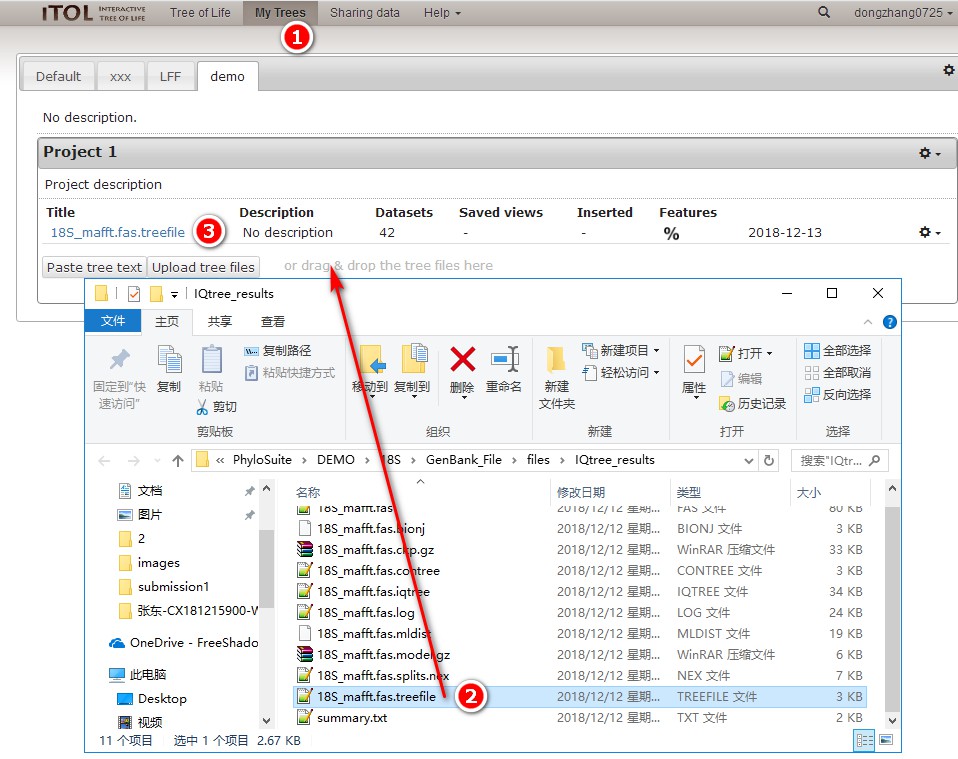
3. Click on the tree title to enter the editing interface.
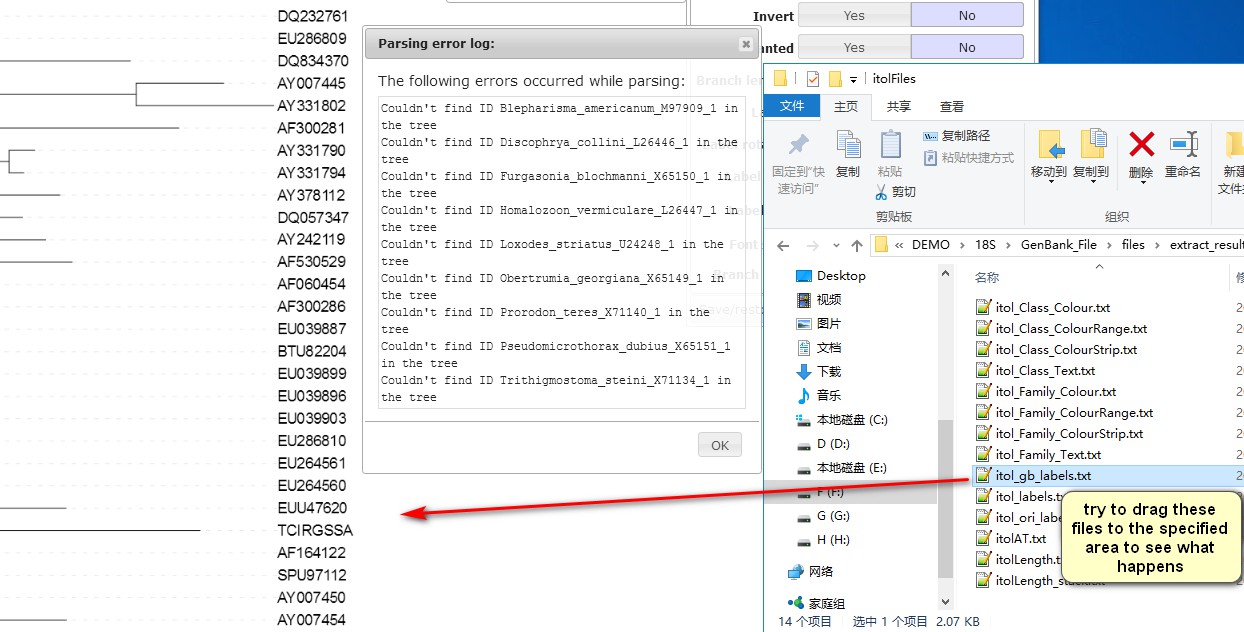
4. Double-click extract_results to open the extraction files (that we generated in section 2). The files within the itolFiles folder are used for iTOL annotation. The operation is very simple, just drag the file into the iTOL interface. As shown in the figure, after dragging in itol_gb_labels.txt, you will find that the name of the species has been replaced with the accession number (in my case, there is an error log showing that some of the listed IDs were not found, because 9 sequences have not been extracted; as it will not affect the annotation, we can ignore it for the purpose of this demo). Two more files can be used to replace names (itol_labels.txt and itol_ori_labels.txt);
5. Check file names to see which taxonomic category information they carry. For example, itol_Class_ColourStrip.txt and itol_Class_Text.txt can be used to annotate (colourize) different classes.
a. Drag these two file (itol_Class_ColourStrip.txt and itol_Class_Text.txt) together into the iTOL interface;
b. Each file is treated as a different dataset by the iTOL. You can set the parameters for each dataset by clicking the jagged setting button;
c. Set the Text size factor of the Class text dataset to change the font size for the name of the class;
d. Set the Strip width of the color_strip dataset to change the width of the vertical block.
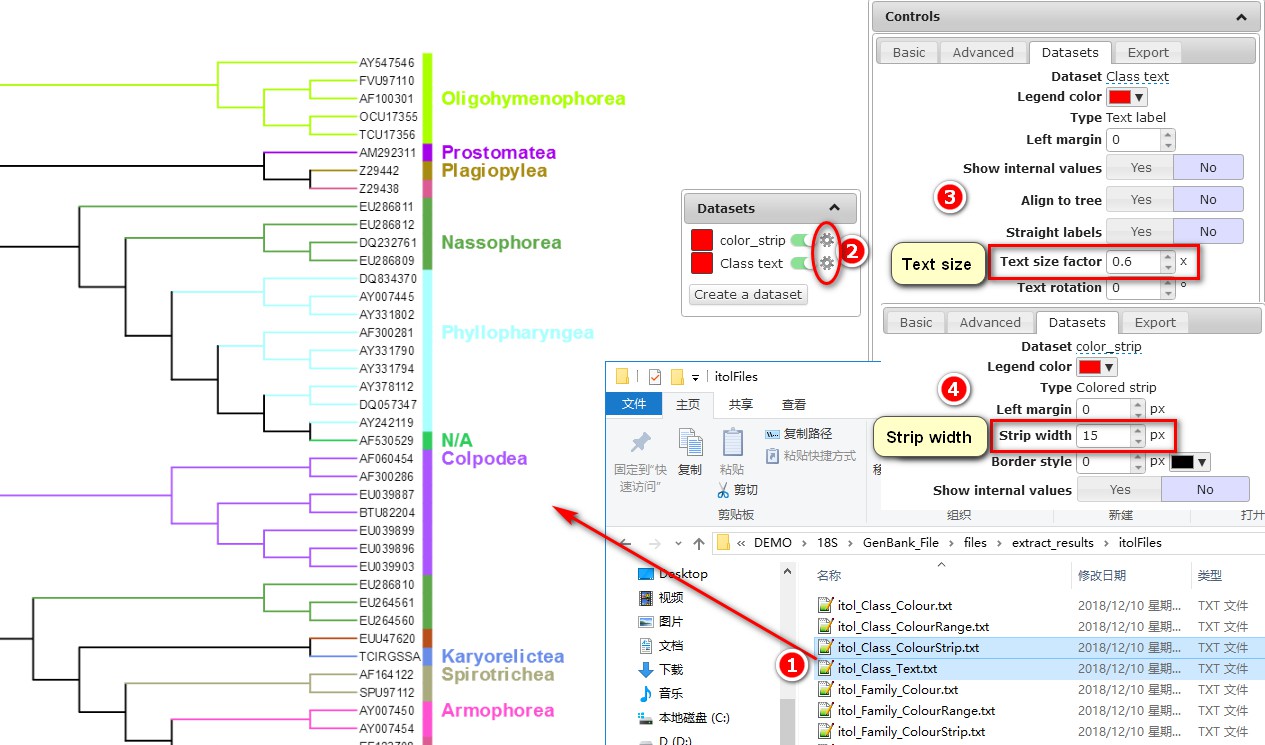
When we extracted the sequences (section 2), there was an option to set the color for the taxonomic groups. The colors of the five classes that we set before can be seen here, while the colors of other classes were randomly chosen. Note that the location of the taxonomic group name may not be in the middle of the colour strip representing the clade (see Colpodea in the figure above), but you can export the tree into an SVG format file and then fine-tune it using Adobe Illustrator.
The advantages of this annotation method are especially pronounced when you have hundreds of species, or when you want to compare multiple topologies based on the same dataset. Colourated annotation is very helpful in such cases, especially for identifying paraphyly and polyphyly
When annotating the BI tree, just drag the *.con.tre tree file into iTOL, and the rest of the operations are the same as for the IQ-TREE tree.
At this point, the single-gene phylogenetic analysis process is finished. This is the complete operation from data acquisition to phylogenetic tree annotation. Of course, you can start from any step. For example, it is possible to start directly from the MAFFT multiple sequence alignment, but in this way there is no way to annotate the phylogenetic tree.
9. Software download website
https://github.com/dongzhang0725/PhyloSuite/releases or http://phylosuite.jushengwu.com/dongzhang0725.github.io/installation/#Chinese_download_link (China)
10. Reference
Zhang, D., F. Gao, I. Jakovlić, H. Zou, J. Zhang, W.X. Li, and G.T. Wang, PhyloSuite: An integrated and scalable desktop platform for streamlined molecular sequence data management and evolutionary phylogenetics studies. Molecular Ecology Resources, 2020. 20(1): p. 348–355. DOI: 10.1111/1755-0998.13096.